How to Create and Fill a Raised Garden Bed
How to Create and Fill a Raised Garden Bed

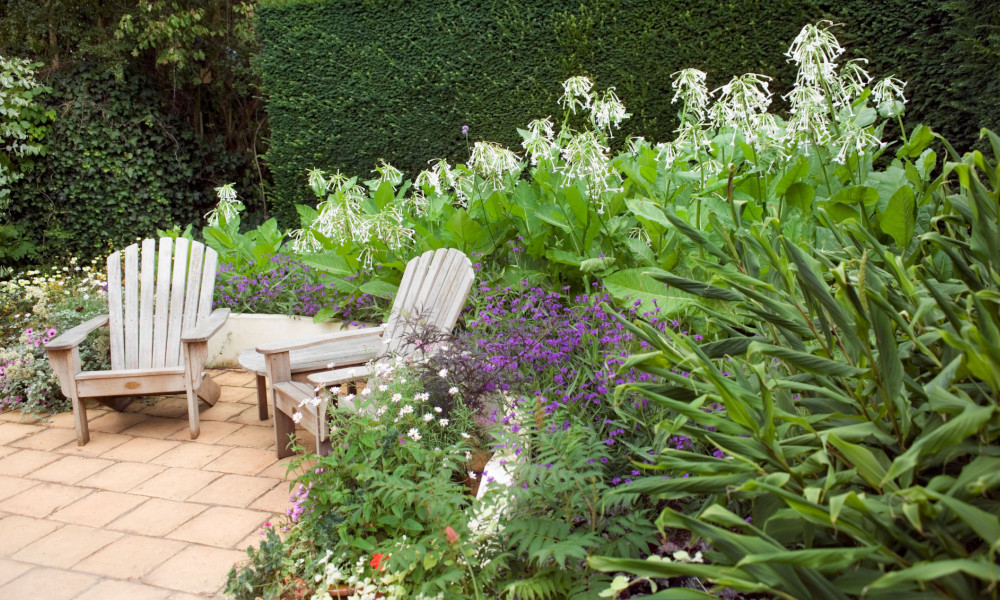
For many of us, the main benefit of a raised garden bed is the ability to garden with a lot less bending and kneeling! The plus points do not end there, though. Raised beds also drain well, and the contained soil warms up earlier in the spring, giving you a longer growing season. Additionally, the soil in a raised bed is not compacted by people walking over it, and the bed’s walls provide a barrier that helps keep out slugs, snails and even weeds. All in all, a raised bed can really work wonders in your garden.
How this bed looks is completely up to you - any shape, style or size is possible, and it can also be as simple as a built-up mound of earth with a flattened top. Practically any material you have to hand can be used to edge it – wood, rocks, bricks or cement blocks (these are particularly good for heat-loving plants). Whatever material you use acts as a baseless frame, protecting the plants in an area of the garden, but still allowing their roots to grow deep into the soil.
Of course, many DIY outlets sell pre-made frames these days – if this labour-free route appeals to you, then it is wise to shop around, as there is a good deal of variation in size, quality and cost. However, if you are willing to try your hand at some simple carpentry, making your own wooden frame is not as difficult as it may seem. To get your started, here is a beginner’s guide to making a simple, wooden, garden bed frame.
Things to consider before you start:
- The width of a raised garden bed
- The height and length of a rasied garden bed
- The space between raised garden beds
- Preparing the site for your raised bed
- Building a double height frame
- Building the frame
- Installing your raised bed frame in the garden
- Preparing your raised bed for planting

The width of a raised garden bed
Beds should be no more than 1.2m wide, so it is easy to reach the centre of the bed. Equally, if you are building the bed against a wall or fence, and you are not going to be able to access it from both sides, consider making a 60 cm wide bed, which is roughly how far most people can reach easily.
The height and length of a raised garden bed
A raised bed can be as high or long as you choose to make it - it really is about what suits you - although you need to remember that the higher or longer you make the walls of the bed, the greater the weight of soil the structure will need to contain. This means if you choose to make an extremely long or high bed, you may also need to install cross supports to stop the planks bowing under the weight of the soil.
If you are keen on making a very long bed, make sure you really consider the extra effort involved in walking the length of the entire bed when you need to tend plants on the other side of it. In most cases, it is a better idea to make a series of shorter beds which offer easier access to all sides.
The space between raised garden beds
If you are planning on building several beds, do think about the spacing between them. Most importantly, make sure there is enough space to push a wheelbarrow between them – remember those beds will have to be filled with soil!

Preparing the site for your raised bed
Ideally, when deciding where to place your bed, you should orientate it with the long side of the bed facing south, allowing all the plants in the bed to get equal light. Once you have settled on a spot, thoroughly turn the earth over with a spade and clear away weeds and rocks. Next, push the newly dug earth towards the middle of the bed site, so the soil doesn’t get in the way when you are trying to put your frame in place.
Building a double height frame
If you want to build a frame with higher walls than the 19.5cm high walls provided by the design below, then you can simply use an extra set of planks and build a second level to this simple frame. However, to build a double height wall, you should use 100mm x 100mm posts (instead of the 45mm x 45mm posts listed below), as this will help strengthen the frame. Also, the cut length of each corner post would need to increase to 65cm, and you may also need to consider adding a cross support to help contain the weight of the soil.

Building a simple 1.2m x 2.4m raised garden bed:
Useful tools:
hand saw, carpenter's level, mallet/sledgehammer, screwdriver and drill
Materials:
3 x 195mm wide x 45mm thick planks of treated timber in 2.4m lengths ( try your local builder's merchant)
1 x 1.82m length of 45mm x 45mm treated timber
16 x 65mm decking screws

Building the Frame
1) Saw one of the 2.4m planks in half to make 2 x 1.2m lengths.
2) Saw the 1.82m length of 45mm x 45mm treated timber into 4 x 455mm lengths to be used as posts.
Note: If you are not handy with a saw, your local builder’s merchant may be willing to pre-cut the wood to the necessary lengths.
3) Place one of the 1.2m planks on the ground with the long side towards you. Lay one of the posts on top of the left end of the plank (at a right angle to the plank) with the post’s extra length extending like a leg below the plank. Make sure the top and sides of the plank and post are perfectly lined up.
4) Using an electric screwdriver, screw the post to the 1.2m plank using 2 evenly spaced screws to securely attach it. Place another post on the other end of the 1.2m end plank, and screw it into place as well.
5) Repeat the process to attach posts to the ends of the other 1.2m plank.
6) With two posts attached to it, stand this 1.2m end plank on its long side, so the legs of the posts point upwards. Line up one of the 2.4m side planks at right angles to the outside of one of the attached posts. Securely attach the 2.4m side plank to the post by drilling 2 evenly spaced screws through the 2.4m plank into the post. Remember to carefully space your screws, taking care not to collide with the screws you have already put in place when you attached the posts to the shorter end plank.
Diagram 1 - Attaching posts to the shorter end planks
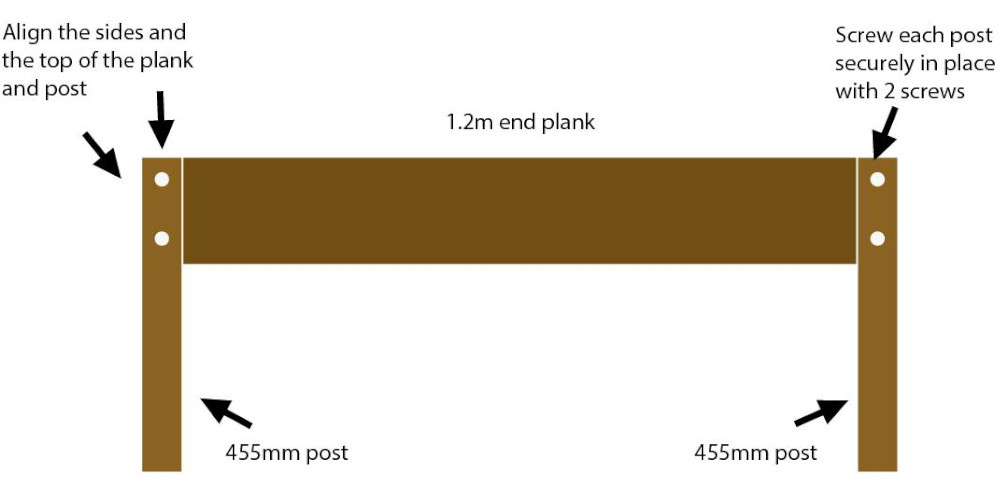
Diagram 2 - Attaching a long, 2.4m side plank to the shorter 1.2m end plank
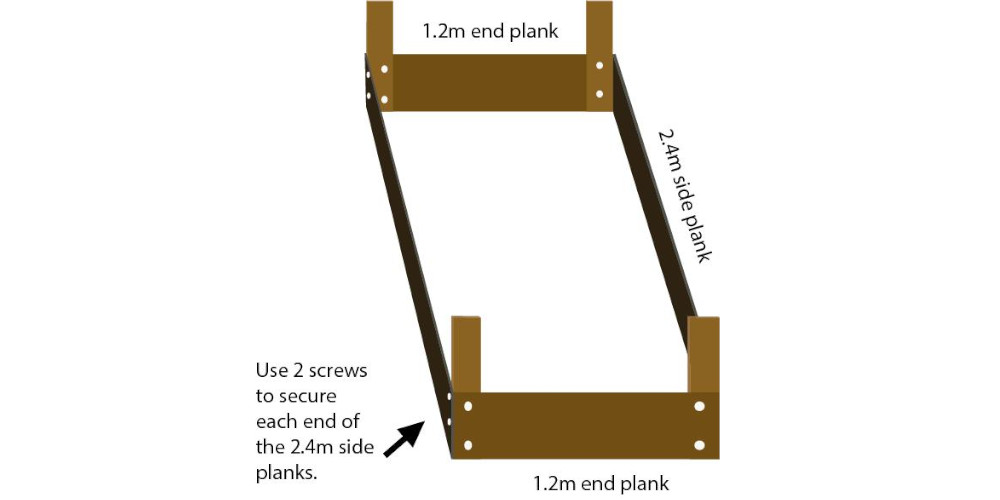
In the same manner, attach the remaining 2.4m side plank to the post on the opposite end of the same 1.2m end plank. Complete the box frame by fitting the last 1.2m end plank (with the posts already attached) between the far ends of the 2.4m side planks.
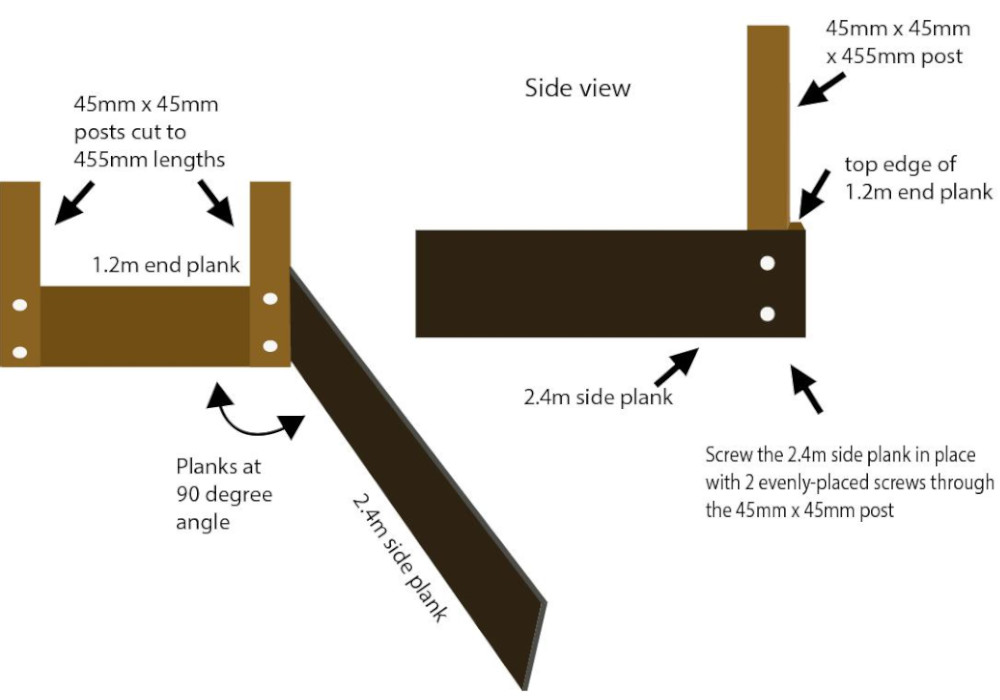
Diagram 3 - Complete the wooden frame
Installing your raised bed frame in the garden
Keeping the frame upside down, move it to the exact spot you are planning to place it, and make sure the position you have chosen allows you enough space to move around it when gardening. When you are happy with the location for the bed, mark the ground where the post holes need to go, and then move the wooden frame out of the way while you dig holes for the posts. Make each hole approximately 26cm deep.
Once the holes are ready, flip your frame over and ‘plant’ the posts firmly in the holes. Make sure the frame is level – you can use a carpenter’s level to check this if you want to be absolutely accurate, or simply adjust it by eye. A mallet or sledgehammer can be used to tap down the posts to even out the level of the sides. Once you are satisfied with the way the frame is sitting, firmly pack soil into any gaps in and around the post holes. Next, thoroughly pack earth around the lower outside edge of the wooden frame to bed it into the ground - this will help stop weeds from infiltrating your garden bed.

Preparing your raised bed for planting
Firstly, it is a good idea to fill the bottom of the garden box with a mix of leaves, grass clippings and other organic material, cover this with a layer of cardboard and then add the soil on top. This will help provide compost-rich soil for future crops.
This is your opportunity to improve on your existing soil, so do not just fill up the frame with soil from the garden. A straight-forward approach is to mix your garden soil 50/50 with organic compost (there are several varieties on our website or use your own home-grown mix) and add some organic fertiliser to the mix as well.
Once you have filled the bed, evenly spread the soil mix with a rake, and then water it with a fine spray. Rake the bed once more and your raised garden bed is ready for use.
To maintain the nutrients in your bed, you will need to feed the soil after each crop. Digging more compost through your soil is an easy way to do this. Alternatively, grow a crop of clover or other green manure every few years, and once it has matured, dig it into the soil and leave it to rot till the following season.
Autumn is a great time of year to build a raised garden bed as the preparation can be done over winter and the frosts will help break down the soil ready for your first crops or plants.
So, Haylofters, we recommend getting the hard work done now to ensure you are prepped and ready to order your plants at the first sign of spring!