How to grow Sambucus (Elder)
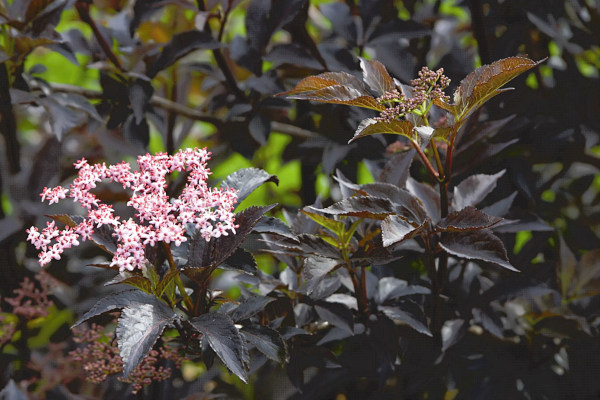
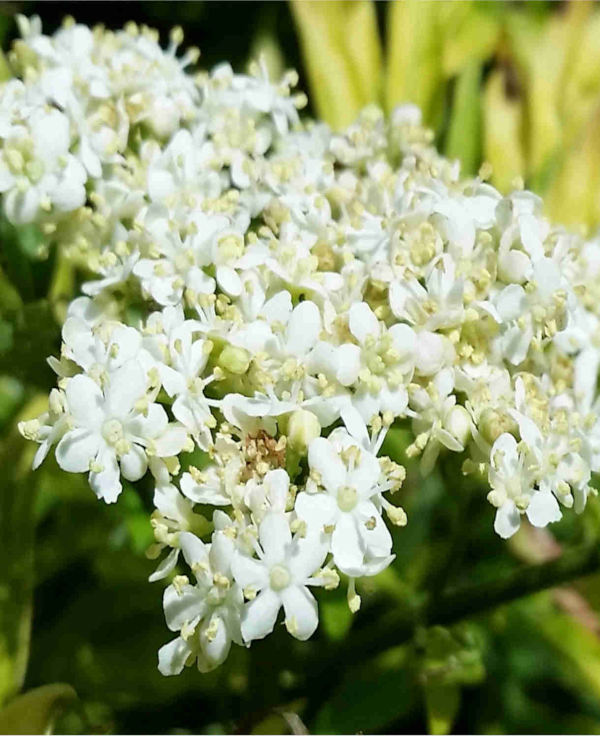
Sambucus, or elder, are vigorous shrubs and trees with large, scented, creamy white or pink flowerheads in summer, followed by small black berries. Flowers can be cut for a vase and also used to make summer cordials and even ‘champagne’! Berries are mildly toxic unless they are cooked but, once processed, make excellent jam or wine too. Sambucus is an excellent way of enticing bees and other pollinators into your garden and fruit offers an abundant feast for wildlife, particularly birds.
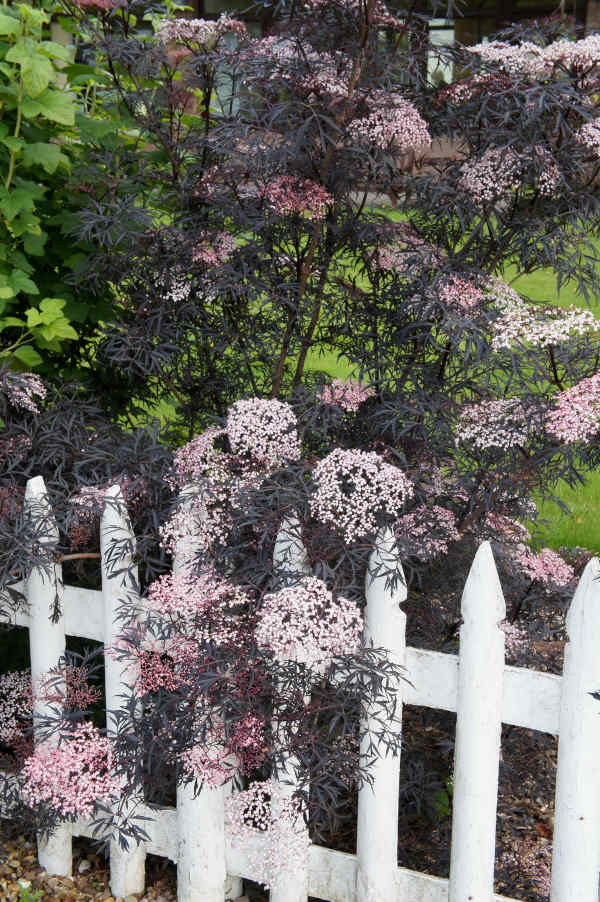
Several broad ranging cultivars are available which have ornamental golden, red or purple leaves as well as the standard green. These colourful plants will add dramatic foliage contrast in the garden as well as the flowers in summer and berries in autumn.
Sambucus thrive in most soils, both wet and dry, making them a particularly good choice for difficult areas in need of height, colour and fruiting interest. They are versatile and vigorous, growing well in most sites and happy to be pruned for size reduction if space is limited. Just ensure that they have some sunshine as Sambucus will not grow well in full shade or very dry soil.
We currently supply several varieties, all of which are hardy (H6), deciduous shrubs or trees which do not need any additional winter protection and cope with temperatures dropping as low as -15 to -20°C.
Zantedeschia is a genus of flowering plants from the family Araceae and is native to southern Africa. With a rich history dating back to the Ancient Romans, these deciduous or semi-evergreen perennials have been used as a symbol of celebration. Zantedeschia was Named after Professor Giovanni Zantedeschia, an Italian botanist.
There are two main forms of Zantedeschia: hardy and tender. Hardy forms of the plant can be grown outdoors, enjoy moist soil and full sun or partially shaded conditions - these are known as Arum lilies. Tender forms of Zantedeschia prefer being grown in containers or pots and should be brought inside over the winter - these are known as Calla lilies.
With tuberous flora in all colours from whites, yellows and oranges to deep reds and purples, Zantedeschias are not to be overlooked in any garden, as long as they have sufficient sunlight to grow in.
Ready to learn more about growing Zantedeschia? Read on for all there is to know...

Key Information
Soil pH

Position
Hardiness

Where & when to plant Sambucus
Position - Full sun or partial shade of any aspect
Soil - Happy in any soil which is moist yet well-drained.
Flowering Period - Summer, with berries in early to mid-autumn
Hardiness - A hardy (H6), deciduous shrub or tree
Sambucus are best planted in spring or autumn, although if your plant is pot grown it can be planted at any time as long as the ground is not frozen or waterlogged. Just bear in mind that if you plant it in summer, it will need extra watering and attention for the first year or so (until the roots have spread out and it has established itself).
Sambucus are suitable for most locations, with the exception of waterlogged areas, and are unfussy on aspect or type of soil, making them adaptable, robust and beautiful. Just remember to pick your variety in accordance with its mature height and spread or be prepared for regular pruning of larger varieties. The varieties we sell range in height from 2.5m to 4.5m, and in spread from 1.3m to 4.5m. The smaller to medium sized specimens can even be grown in pots if this appeals to you.
How to plant Sambucus
If your plant is relatively young and smaller on arrival, it may be best nurtured in a pot whilst it establishes a good root structure although plants are generally robust enough to go straight into the ground.
For planting in containers, first choose an appropriately sized pot and ensure that you do not swamp your plant by choosing too large a container.
If you are using a large or heavy pot, it can be a good idea to fill and plant it in situ to save yourself the trouble of moving once full.
Use a good quality all-purpose compost, and, if not already present in the compost (check the description on the bag) some suitable slow-release fertiliser granules.
Start by partially filling the pot with compost; enough so that when placed on it the upper surface of the root ball is about 3cm lower than the top of the pot.
Infill all the space surrounding the root ball with compost, firming down with your fingers then adding a little more so the plant is held tight.
Pick up the container and lightly tap on the potting bench or ground a few times to help further settle the compost around the plant.
Water well to both settle the soil and give the plant a good drink.
A mulch with horticultural grit will look attractive and help to prevent a ‘cap’ or crust forming on the top of the compost (something container plants can suffer due to the artificial nature of their watering).
For planting in the garden, dig over the whole planting area, removing any large stones and weeds and breaking up any lumps. Mix in some organic matter such as manure or garden compost to roughly one bucketful per square metre. If your soil is heavy clay, now is also the time to add some horticultural grit to assist with drainage.
Rake level and firm with your heels. Rake level again.
Water plants well and allow to drain before planting. A good tip is to dig a hole twice the size of the root-ball. Fill with water and allow to drain before placing in the plant.
Place the plant in the hole, ensuring the top of the root ball sits level with the surface of the soil. Too low and the plant may rot, too high and the roots can dry out.
Backfill with soil and firm in gently with your foot.
If you have purchased a more mature tree, then stabilise by using a tree stake at a 45° angle to the trunk and a soft tie so as not to rub the bark. This will prevent too much rocking until a good root structure has established as an anchor.
Soak well with water.
Mulch around the base with well-rotted organic matter.
What to plant with Sambucus
These plants are beautiful in their own right and ideal for locating anywhere in the garden which offers the necessary protection and allows you to make the most of the silvery tassles and the silvery underside of the verdant leaves which will shimmer in the breeze. They combine well with other evergreen, contrasting foliage at the back of the border for variation and cover all year round. Equally, the shade provided by the leaves makes them ideal for underplanting with spring bulbs or ferns, hostas and hellebores.
How to care for Sambucus
Pruning and Training
Young trees or shrubs should not be pruned for the first couple of years.
Pruning is not essential but can be done to keep plants to a manageable size and ensure that you make the most of the fresh growth low down on your plant. Pruning will also reduce the size of a large, well-established tree which has become too big for its space. Pruning will also encourage more ornamental foliage. Hard prune in late winter or early spring to encourage a flush of new growth which will carry particularly bright and vibrant leaves.
Also remember to remove any crossing, rubbing or badly placed shoots for aesthetics and any dead, diseased or damaged ones to maintain a healthy shrub. Renovate where appropriate by cutting back plants gradually over three to four years, forming a low framework of branches.
Watering
Water your new plant regularly for at least the first two years. Once established, it should cope well without extra watering, except in particularly hot, dry spells.
Feeding
Sambucas don’t generally need feeding, but a spring feed will encourage vigorous growth after pruning. Also bear in mind container grown plants are more dependent upon you for their nutrients so feed regularly. Use a general purpose fertiliser such as fish, blood and bone then apply a mulch or organic matter on top.
Pests and Diseases
Sambucas are generally robust and healthy plants, rarely troubled by pests and diseases. However, young shoots may sometimes become infested with blackfly, and occasionally verticillium wilt can be a problem.
How to propagate Sambucus
This can be done by softwood cuttings in early summer if you have a greenhouse or a propagator. Otherwise, take hardwood cuttings in winter.
- Select the softwood cuttings from this season’s growth and remove them using sharp secateurs.
- Place the cuttings in a plastic bag straight away. Keep the bag in the shade and aim to pot the cuttings within 12 hours.
- Prepare the cuttings by trimming them to 10-15cm long, cutting just below a leaf node. Next, remove the lowest leaves and the soft tips. There will be about four leaves remaining. If leaves are large, cut them on half to reduce transpiration.
- Dip the bottom of the cutting in fresh hormone rooting powder, ensuring that the cut is well covered. Tap to remove any excess.
- Insert the cuttings around the edge of a suitably sized containers allowing some space between each and use filled with cuttings use 50 per cent free-draining potting compost mixed with 50 per cent sharp sand or perlite. Water well and allow to drain.
- Place the container of cuttings in a greenhouse. Alternatively, cover pots with a plastic bag and put in a warm, light position, out of direct sunlight.
- Remember to remove any excess moisture to prevent rot but keep the compost damp. Cuttings taken in summer seldom need bottom heat but by autumn cuttings will root more quickly in a heated propagator.
- Transfer to separate pots once a good root structure has been achieved for each cutting and grow on as for young plants.
- Select the hardwood cuttings from vigorous healthy shoots that have grown in the current year.
- Remove the soft tip growth and cut into sections 15-30cm long, cutting cleanly above a bud at the top, with a sloping cut to shed water and as a reminder which end is the top.
- Cut straight across at the base below a bud or pair of buds and dip the lower cut end in hormone rooting powder. Cut through the ‘heel’ where the shoot joins a branch for shrubs with pithy stems such as Sambucus.
- Prepare a trench outdoors in a sheltered site with well-drained soil. Dig in a bucketful of garden compost or other organic matter every square metre or yard.
- Insert the cuttings into the ground (or pot) with two-thirds of the cutting below the surface, with a layer of sand in the base. The roots will form along the stem. A few buds remain above the ground to allow the plant to grow away in spring.
- Allow 10-15cm between cuttings and 40cm between trenches.
- Check the trench after frosts and firm back if required.
- Cuttings should be left in place until the following autumn ensuring that they do not dry out in dry periods in summer.
- If you are only taking a few cuttings, there is no need to dig a trench as outlined above, simply insert cuttings into deep containers of gritty potting medium such as 50:50 coarse grit and multi-purpose compost. Keep the pots in a sheltered cold frame or unheated greenhouse until the following autumn, ensuring that they do not dry out.
*Many plants carry Plant Breeders Rights and cannot be propagated for commercial purposes.
Common Sambucus questions
Is sambucus fast growing?
Sambucus is a fast-growing woody plant with a growth rate of 50 to 70 centimetres per year. Check the height and spread of your chosen specimen and ensure that it has room to grow or be prepared to prune regularly.
Can sambucus grow in shade?
Sambucus are happy in sun or partial shade. They may not thrive in full shade where the leaf colour and fruiting ability is likely to be compromised. In the wild sambucus tend to grow at the edge of woodland which offers them dappled shade.