How to grow Phormium
Phormium is a small genus of just two species, both evergreen perennials from New Zealand. It was historically used as a source of fibre for traditional Maoria textiles and ropemaking.
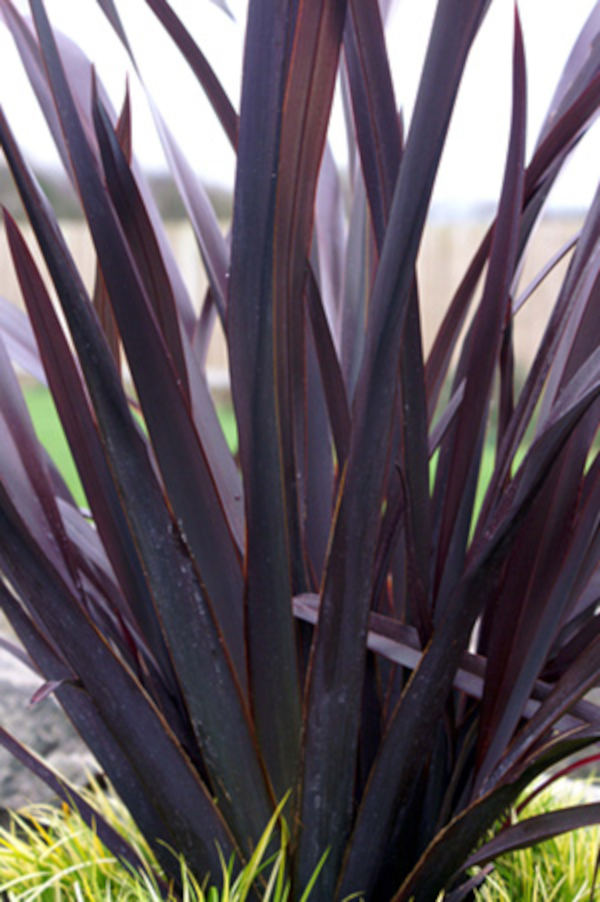
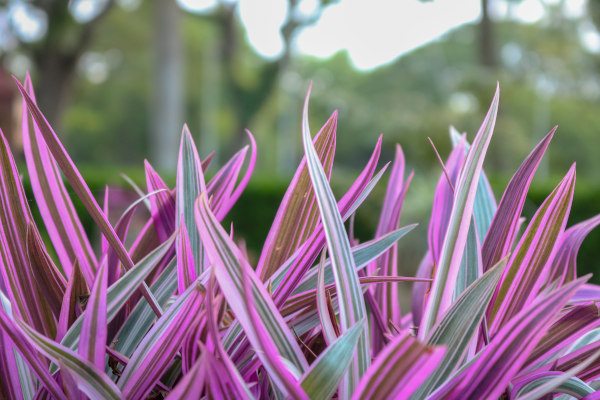
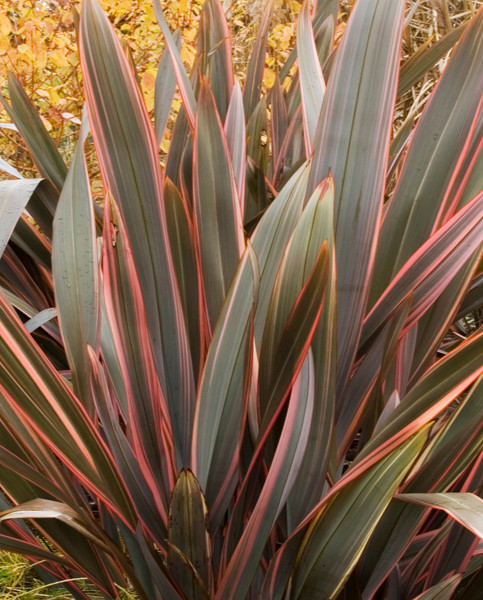
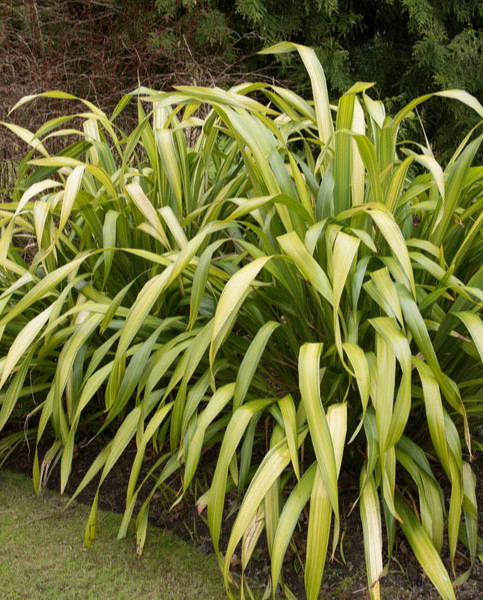
Phormium forms slowly spreading, exotic-looking clumps of large, sword-like leaves, each folded into a V-shape at the base. Its many cultivars offer colourful foliage (ranging from yellow-green to bronze-purple) and often have variegated markings. In summer, tall stems bear dramatic panicles of flowers.
Key Information
Soil pH

Position
Hardiness

Where to plant Phormium
For best results, plant in autumn or spring. An autumn planting is suitable for those gardening in mild conditions (broadly speaking, the southern half of the UK). For those liable to very cold winters it is best to wait until spring (generally the northern half of the UK). Planting can also be carried out during summer, though a watchful approach to watering is required.
Depending on the variety, phormium can be upright and therefore suitable for using amongst other plants in a border, or more arching and better placed in a container or as a focal point in the garden. Check the description of your phormium to help in choosing an appropriate spot. Whatever the situation, phormium will always require sunny and well-draining growing conditions.
In milder parts of the country and around the coast, phormium can take a degree of exposure to the wind. In northern parts, or those areas prone to colder winters, it needs to be grown in a sheltered position.
How to plant Phormium
In the ground
- Clear the chosen area of weeds.
- Dig a planting hole several times larger than the root ball. If you are gardening on poor soil, it is a good idea to mix in some well-rotted organic matter at this stage. Avoid soil prone to winter waterlogging.
- Place the plant in the hole, ensuring the top of the root ball sits level with the surface of the soil. Too low and the plant may rot, too high and the roots can dry out.
- Backfill with soil and firm in gently.
- Soak well with water.
- Mulch around the base with well-rotted organic matter.
In a container
- Choose an appropriate container (the bigger the better), ensuring there are plenty of drainage holes.
- Use a good quality potting compost with plenty of horticultural grit mixed in, and, if not already present in the compost (check the description on the bag) some slow-release fertiliser granules.
- Start by partially filling the pot with compost; enough so that when placed on it the upper surface of the root ball is about 3cm lower than the top of the pot.
- Infill all the space surrounding the root ball with compost, firming down with your fingers then adding a little more so the plant is held tight.
- Pick up the pot (if you can!) and lightly tap on the potting bench or ground a few times to help further settle the compost around the plant.
- Soak well with water.
- A mulch with horticultural grit will look attractive and help to prevent a ‘cap’ or crust forming on the top of the compost (something container plants can suffer due to the artificial nature of their watering).
What to plant with Phormium
This hugely versatile plant mixes easily with a wide range of planting styles. We particularly love it in a lush, low maintenance foliage scheme, alongside trachycarpus, fatsia, cordyline, and musa, with sun-loving groundcover plants underneath such as vinca and artemisia.
For a container display, grouping phormium with a selection of pot-grown grasses is simple yet very effective. Think stipa, pennisetum, miscanthus, and imperata, to name just a few.
If you would like any further planting ideas or growing advice for your phormium, please contact our friendly and knowledgeable Customer Care Team - we will be more than happy to help you.

How to care for Phormium
Pruning and Deadheading
This evergreen herbaceous perennial requires no pruning other than a light tidy in spring. Remove withered leaves either by gently pulling (with a gloved hand, as they can be sharp), or by cutting close to the base. Cut spent flower stems down at the same time.
Watering
Water until established, after which phormium tends to be fairly drought tolerant. Phormium grown in a container will require regular watering throughout the growing season. Allow the top few centimetres of compost to dry out between soakings.
Cold Protection
Some cultivars, such as ‘Jester’ and ‘Sundowner’, are half-hardy and at risk if temperatures dip below 0°C. This means they will require winter protection in frost prone areas. Protection may take the form of a deep, dry mulch around the crown and wrapping top growth with fleece, or moving container grown plants to an unheated greenhouse or conservatory. If you must leave containers outside, try wrapping the whole thing (pot and all) in fleece.
Other cultivars, such as ‘Black Velvet’ and ‘Yellow Wave’, are hardy to between -5°C and -10°C, meaning they will withstand the average UK winter without the need for additional protection. Even so, a deep, dry mulch around the crown (such as straw, bracken, or bark chippings) can’t hurt. Container plants can be more vulnerable to the cold, so it is worth protecting them as above.
As with most drainage-loving plants, hardiness can be significantly impaired by sitting in wet soil during winter. This is why it is important to avoid any areas prone to waterlogging.
Pests and Diseases
Phormium can be host to the phormium mealybug, a sapsucking insect which tends to cluster around the base of leaves. It secretes honeydew which can then encourage sooty mould, resulting in a blackened appearance.
Once present, there is very little that can be done about this pest. As an introduced species it has no known natural predators in the UK, and none of the usual methods of pest control have been found to be effective. Fortunately, mature plants tend to tolerate infestations without their overall health being affected. Younger plants may struggle more, in which case it can be best to replace them.
The best line of defence is to thoroughly check any new phormium before introducing it to your garden. As this pest can’t fly or exist on any other plant, the only known method of spread is from the buying and planting of an already affected specimen.
How to propagate Phormium
Phormium can be propagated by lifting and dividing in spring. Not only will this provide you with new plants, but it will also maintain the health and vigour of the existing clump.
- Choose a day when the soil is not frozen or waterlogged.
- Dig the plant out of the ground.
- Shake off any excess soil.
- Separate the plant into sections using either swift, cutting blows with a sharp spade, or two forks inserted back-to-back with tines touching, handles then pushed together to prise the plant apart.
- If this proves difficult, cutting through the rootball with a pruning saw will work just as well (just make sure it isn’t new or precious!).
- Discard old, damaged, or surplus pieces, keeping healthy, vigorous material with a good root system attached.
- Replant selected pieces where desired.
- Water well until fully established.
Common Phormium Questions:
What conditions does phormium like?
Phormium enjoys plenty of sunshine and a well-draining soil. In milder and coastal areas, it doesn’t mind wind, though in colder northern gardens it prefers a sheltered spot. See ‘When and where to plant phormium’ section above for more details.
Can phormium grow in shade?
Most types of phormium can cope with partial shade, though for best results (i.e., maximum vigour and vibrant colour) full sun is preferable. Deep shade is not recommended.
How quickly does phormium grow?
Phormium has an average growth rate, and when grown in optimal conditions tends to reach its eventual size in 3-5 years. This can be slower if grown in very light, dry soil or partial shade.
How do you distinguish a phormium from a cordyline?
These two plants can look very similar when young. Phormiums tend to have broader leaves which always grow from ground level. Cordylines on the other hand go on to develop a central, woody stem with the (often narrower) leaves growing in a tuft at the top – a little like a palm tree.