How to grow Dryopteris
Dryopteris are ferns within a subgroup of Dryopteridoideae in the Dryopteridaceae family There are 300-400 species in this genus. Commonly called Wood Ferns, Buckler Ferns or Male Ferns.
With species dotted throughout Asia, The Americas, Europe and Africa Dryopteris are widely distributed with small varieties best suited to cracks in walls to other varieties that grow 1.2m tall.
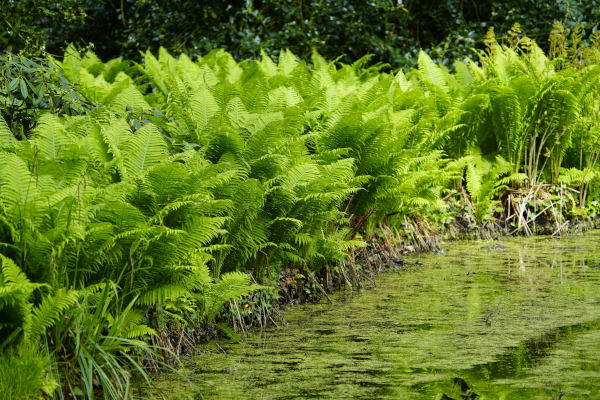
Within the genus are evergreen and deciduous types that will do well in most garden settings from shady or sunny to moist and dry locations when mature.
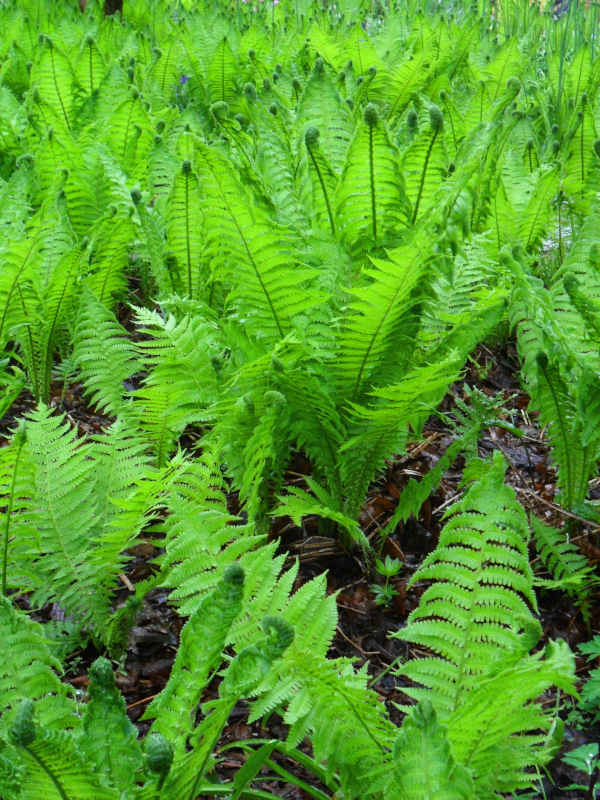
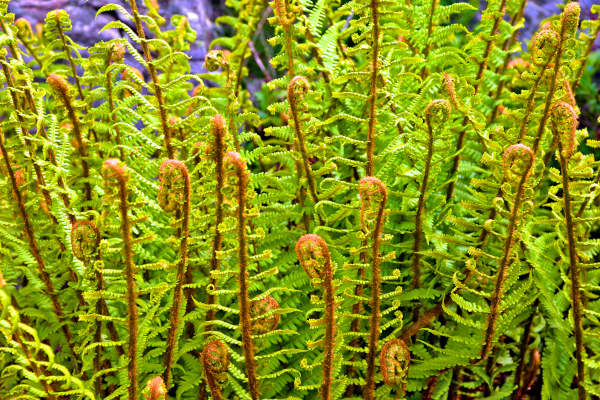
Many of the species have stout, slowly creeping rootstocks that form a crown, with a vase-like ring of fronds.
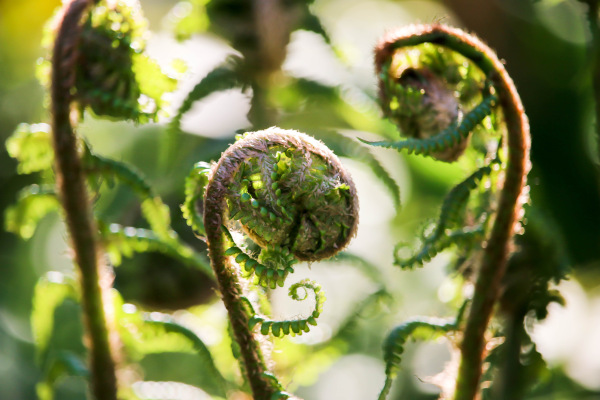
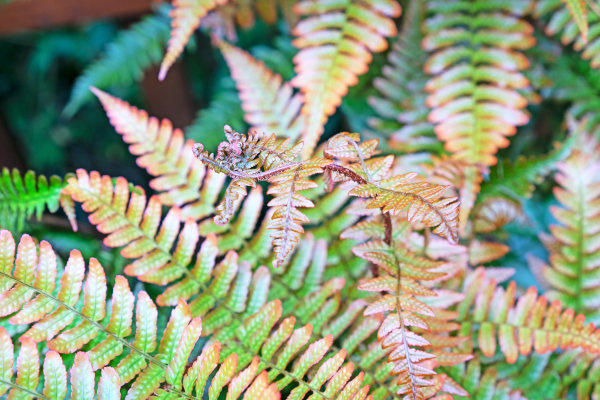
Upon each leaf frond the sori ( scales on the underside of the leaf) are round. The frond stem, stipe, have prominent scales and hairs which look beautiful as its new fronds unfurl in spring light.
Compounds from Dryopteris Filix-mas were used until recently as a drug treatment for parasitic worms in the digestive system of humans and animals.
Zantedeschia is a genus of flowering plants from the family Araceae and is native to southern Africa. With a rich history dating back to the Ancient Romans, these deciduous or semi-evergreen perennials have been used as a symbol of celebration. Zantedeschia was Named after Professor Giovanni Zantedeschia, an Italian botanist.
There are two main forms of Zantedeschia: hardy and tender. Hardy forms of the plant can be grown outdoors, enjoy moist soil and full sun or partially shaded conditions - these are known as Arum lilies. Tender forms of Zantedeschia prefer being grown in containers or pots and should be brought inside over the winter - these are known as Calla lilies.
With tuberous flora in all colours from whites, yellows and oranges to deep reds and purples, Zantedeschias are not to be overlooked in any garden, as long as they have sufficient sunlight to grow in.
Ready to learn more about growing Zantedeschia? Read on for all there is to know...

Key Information
Soil pH

Position
Hardiness

Where & when to plant Dryopteris
Position - Dappled Shade / Part Shade / Full Shade
Soil - Moist free drained humus-rich soil/. Will grow in chalk, clay, sand and loam.
Flowers - Not applicable
Horticultural Divisions - here we list out the most popularly cultivated species and hybrids available in the U.K.
| Species | Common name |
H6 -20°C to -15°C Fully Hardy
| Dryopteris affinis | Scaly male fern |
Dryopteris celsa | Log fern | |
Dryopteris clintoniana | Clintons wood fern | |
Dryopteris crassirhizoma | Thick stemmed wood fern | |
Dryopteris cristata | Crested buckler fern | |
Dryopteris cycadina syn. Dryopteris atrata | Shaggy wood fern | |
Dryopteris dilatata | Broad buckler fern | |
Dryopteris erythrosora | Copper shield fern | |
Dryopteris filix-mas | Male fern | |
Dryopteris goldieana | Giant wood fern | |
Dryopteris intermedia | Fancy fern | |
Dryopteris marginalis | Evergreen wood fern | |
Dryopteris sieboldii | Siebold’s wood fern | |
Dryopteris varia | Japanese holly fern | |
Dryopteris wallichiana | Alpine wood fern |
Dryopteris can be planted all year around when purchased grown in pots so long as the ground is not frozen or waterlogged.
If container grown plants are planted out during the active summer growing season make sure that they are watered regularly until the plant has settled into its new location. Water at soil level rather than the foliage.
Ideal for beds and borders and at the base of larger trees and shrubs Dryopteris are easy, low maintenance plants and can look great when planted in patio containers as single specimens or mixed plantings.
Dryopteris prefer moist, cool sites and will grow in full sun when mature if plenty of moisture at its roots.
How to plant Dryopteris
- For planting in the garden, dig the soil area removing any large stones and weeds and breaking up any lumps. Mix in some organic matter, ideally leaf mould, though manure or garden compost are also fine. Rake level and firm with your heels. Rake level again.
- Water plants well and allow to drain before planting.
- A good tip is to dig a hole twice the size of the root-ball. Fill with water and allow to drain before placing in the plant which is especially good for summer plantings.
- Remove the plant from its pot placing the plant in the hole, ensuring the top of the root ball sits level with the surface of the soil. Too low and the plant may rot, too high and the roots can dry out
- Backfill with soil and firm in gently with your foot.
- Soak soil well with water.
What to plant with Dryopteris
How to care for Dryopteris
Pruning and Deadheading
Simply remove any dead or damaged fronds of your dryopteris as necessary by cutting off at the base. A good time to do this is in spring so you can see the new fronds (crosiers) unrolling as they grow.
Watering
On planting outside, they benefit from a good watering in on planting and then regular soakings until established. After this they shouldn’t need watering.
For container grown plants water regularly to keep moist at all times. Allow the top few centimetres to dry out between soakings is a good rule of thumb to avoid overwatering. To check this, wiggle your finger down into the soil until you hit a cool, damp bit.
Water the soil around the plant rather than its leaves. Over wet fronds or crown could cause rot.
Feeding
On healthy, fertile soil, a mulch of well-rotted organic matter (i.e., a layer of leaf mould, manure, or garden compost applied to the soil around the plant) should provide enough nutrients for your dryopteris. This has the added benefit of suppressing weeds and locking in moisture. Mulch when planting, and then again each spring.
If you garden on poor soil or your dryopteris looks in need of a boost apply a granular general purpose feed to the surface of the soil and lightly working in can reap benefits. This is known as a top dress and should be done when you’re mulching in spring – first apply the feed, then cover with the mulch.
Cold Protection
Dryopteris are hardy garden plants and should not need protection. If planted in an exposed or windy location ‘Jack Frost’ could nip the new crosiers (fronds) as they grow.
Pests and Diseases
Dryopteris are generally pest free.
How to propagate Dryopteris
The easiest way to propagate dryopteris is by root division.
When your plant is at least 3 years old and has been growing well in the previous season you should be able to divide the root structure into more plants during spring. Depending on the habit of your dryopteris there are 2 ways this can be done.
Creeping rhizomes (roots)
- Make sure the plant is not suffering from drought, pest or disease.
- Lift plants carefully by digging all around its crown with a fork.
- Shake off excess soil so you can clearly see the roots.
- Carefully segment the rhizomes into segments with each segment containing at least one growth bud and a small root.
- Pot up each segment individually into pots of good quality compost. Hold the growth bud carefully with fingertips of one hand. The growth bud must be at surface level and its roots are dangling into the pot. With the other hand backfill the compost around the roots lightly firming in.
- Water well and leave in a light shady spot keeping moist at all times.
- The dryopteris should show signs of further growth within a couple of weeks.
Crown splitting
It may take many years for your fern to develop multiple crowns. – where there are several shuttle-cock like crowns from one plant.
Many nursery grown plants may already have multiple crowns as they are pricked out and potted up as clumps.
- Make sure the plant is not suffering from drought, pest or disease.
- Lift plants carefully by digging all around with a fork.
- Shake off excess soil so you can clearly see the roots.
- Using 2 forks back to back as levers tease apart the crowns ensuring each crown has a good portion of root.
- Replant in the garden, dig the soil area removing any large stones and weeds and breaking up any lumps. Mix in some organic matter, ideally leaf mould, though manure or garden compost are also fine. Rake level and firm with your heels. Rake level again.
- A good tip is to dig a hole twice the size of the root-ball. Fill with water and allow to drain before placing in the plant which is especially good for summer plantings.
- Placing the plant in the hole, ensuring the top of the root ball sits level with the surface of the soil. Too low and the plant may rot, too high and the roots can dry out
- Backfill with soil and firm in gently with your foot.
- Soak soil well with water.
- Check regularly and water if soil if it’s dry. Wiggle your finger down into the soil until you hit a cool, damp bit to decide if you need to water or not.
Ferns can be sown using the spores from the mature fronds. Spores are the ferns dust like equivalent to seeds.
Collecting spores
- The sori (small heaps of spores on the underside of a frond) are pale green when unripe and usually become deep brown or black as they ripen. If the sori are a pale rusty brown, the spores have probably already fallen. However, as spores ripen in sequence (from tip to stem), it is often possible to find both ripe and unripe spores on a single frond, especially in mid to late summer
- To collect spores, place a small piece of spore-bearing frond in a dry paper envelope and keep for a day or so in a warm, dry place. Any spores present will then have settled in the bottom of the packet as a dust-like brown, yellow or black powder
Sowing dryopteris spores
- Fill seed tray with sterilised, fresh good quality seed compost. Level and firm with the base of another seed tray. Water well and leave to drain.
- Carefully scatter the spores across the compost surface of the tray.
- Cover tray with a sheet of glass or cling film to keep humidity within the sowing area. Label and date the tray.
- Place the seed tray in a light sheltered area at 15-20o Check a couple of times a week for signs of life and to ensure the compost is still moist and not saturated. Germination may take 2-3 months. Protect against pests such as slugs, and mice.
- A green film will be visible on the soil surface which will gradually form into filmy green structures called
- After another month or so the first tiny fronds will appear. You can now begin to harden off the seedlings by removing glass or cling film for longer periods to allow ventilation. Start from 15 minutes and slowly work up to total removal over a month. Keep seedlings at around 12-18o Keeping seed tray moist at all times and away from direct sunlight or draughts which could be fatal to the tiny plants.
- When 2 or 3 fronds are visible on each plant prick the young plants out into finger nail sized clumps. Fill and lightly firm 5cm pots of sterilised, clean, fresh compost. Dib a hole into the pot the size of the root ball so that the plant sits level with the surface of the compost. Lightly firm in.
- Place a clear food bag held above the plants fronds held in place with an elastic band on the pot to maintain humidity for 10 -14 days. Slowly harden off young plants over the course of a couple of months by removing the polythene bag for longer periods, protecting from direct sunlight, draughts and pests.
Midsummer sowings may produce fronds by winter, autumn sowings will often not show signs of development until spring.
It will take up to 2 years for the ferns to be large enough to be planted into the garden.
*Soil Sterilisation
To ensure you are growing the fern you’ve sown, the compost must be sterilised to eradicate any other stary fungal moss or fern spores which may be contained within the compost.
- Level fill your seed tray with fresh, clean seed compost as directed. Place on a draining board.
- Cut a sheet of newspaper to fit the surface of the tray.
- Pour boiling water slowly onto the newspaper until steaming water is coming from the bottom of the tray
- Cover the tray with a sheet of glass or clingfilm until the compost is cool and ready to use.
- Remove the newspaper when ready to sow.
* Many plants carry Plant Breeders Rights and cannot be propagated for commercial purposes.
Common Dryopteris questions
Does Dryopteris grow back if you cut it?
Yes Dryopteris will grow back. Cut damaged or dead fronds to ground level. New fronds will grow from the crown underground.
Are there male and female Dryopteris?
Commonly Dryopteris filix-mas is called the ‘Male Fern’ and the common name for the different genus Athyrium filix-femina is ‘Lady Fern’ this is why Common names can be confusing.
Dryopteris do not have separate male and female plants. Dryopteris have both male and female parts which can also be known as hermaphrodite although in Dryopteris it is called Gametophytes.
Is Dryopteris poisonous to dogs?
Dryopteris has no known toxic effects reported.