How to grow Cornus
Also known as dogwood, cornus is a genus of deciduous shrubs and small trees, plus one herbaceous perennial – the beautiful groundcover plant Cornus canadensis.
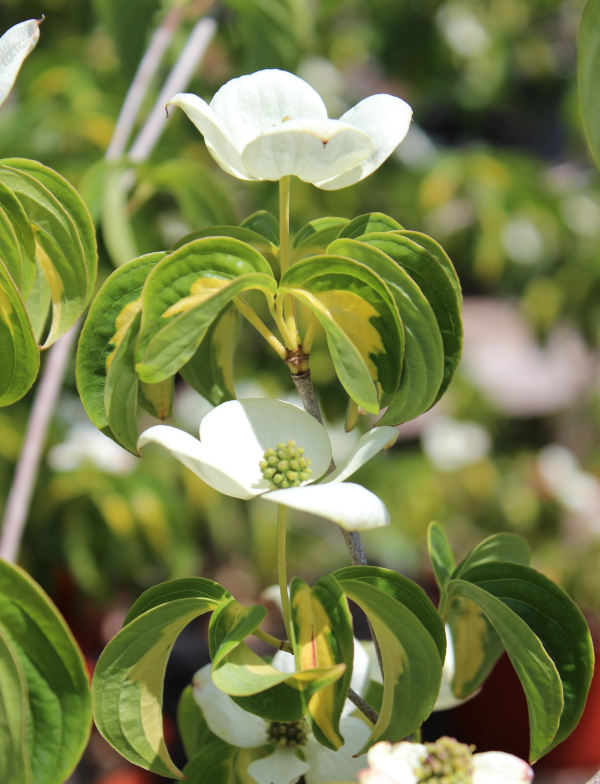
The woody species can be loosely split into two types: flowering dogwood, and dogwood grown for its colourful winter stems. Flowering dogwoods (C. kousa, C. florida, C. capitata, C. mas, C. officinalis, C. controversa, C. nuttalli) are usually small trees with an elegant habit, large, showy bracts, and good autumn colour. They can be slow to establish and require a little extra care for at least 3-4 years after planting.
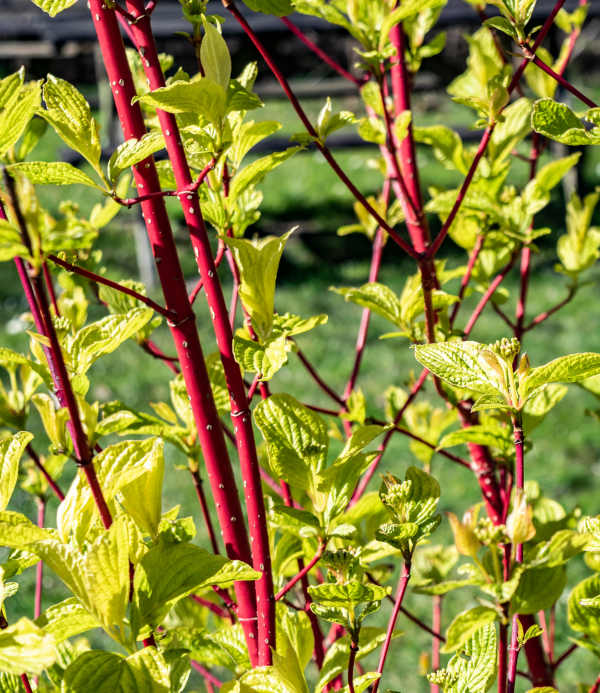
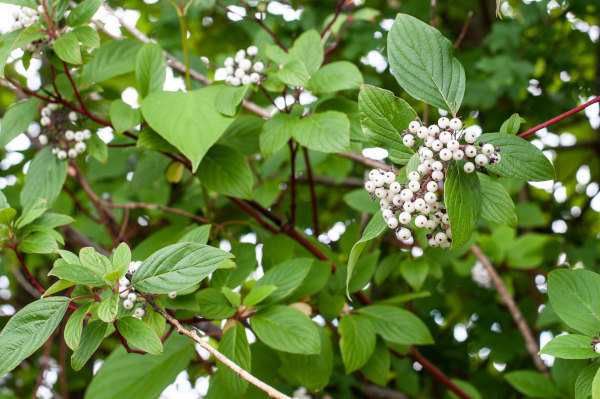
Colourfully stemmed dogwoods (C. alba, C. sericea, C. amomum, and the UK native C. sanguinea), have insignificant flowers but offer a wonderful array of bright, fiery shades during the bare winter months. They are some of the hardiest, toughest shrubs you can grow, asking only for a hard prune each spring to generate fresh, vibrant growth. Leaving them to mature into larger shrubs is an option, though means losing out on the colour only seen on young stems.
Dogwood comes from the Old English word of ‘dagwood’. The extremely hard timber of these trees is thought to have been used to make arrows, or ‘dags’.
Zantedeschia is a genus of flowering plants from the family Araceae and is native to southern Africa. With a rich history dating back to the Ancient Romans, these deciduous or semi-evergreen perennials have been used as a symbol of celebration. Zantedeschia was Named after Professor Giovanni Zantedeschia, an Italian botanist.
There are two main forms of Zantedeschia: hardy and tender. Hardy forms of the plant can be grown outdoors, enjoy moist soil and full sun or partially shaded conditions - these are known as Arum lilies. Tender forms of Zantedeschia prefer being grown in containers or pots and should be brought inside over the winter - these are known as Calla lilies.
With tuberous flora in all colours from whites, yellows and oranges to deep reds and purples, Zantedeschias are not to be overlooked in any garden, as long as they have sufficient sunlight to grow in.
Ready to learn more about growing Zantedeschia? Read on for all there is to know...

Key Information
Soil pH

Position
Hardiness

Where & when to plant Cornus
Position - Flowering, stem colour, and leaf variegation is best in full sun, though some light shade will be tolerated. It is best to plant flowering species in a sheltered spot. This is both to prevent their heavy, flower-laden branches from snapping in the wind, and to maximise the length of time you get to enjoy the colourful autumn leaves.
Soil - All cornus species thrive in reliably moist but well-draining, slightly acidic, rich, fertile soil. Colourfully stemmed species are tolerant of damper though not waterlogged soil.
Flowering Period - Varies depending on species. Most flowering types bloom in summer, though the yellow-flowered C. mas and C. officinalis are winter blooming.
Hardiness - Hardy. Most are rated H7, i.e., as hardy as it gets, capable of surviving temperatures of -20°C and below. C. kousa is a little less, rated H6 (-15°C to -20°C), though still more than capable of withstanding a UK winter. A handful of cultivars are rated H5 (e.g., C. sanguinea ‘Anny’s Winter Orange), meaning -10°C to -15°C. Again, this shouldn’t be a problem throughout most of the UK, though perhaps avoid planting these if you garden in a very chilly frost pocket.
In theory, container-grown trees and shrubs can be planted at any time of year, though for best results do so in autumn (the best option), winter, or early spring. It is important to choose the right day – frozen or waterlogged conditions should be avoided. Try not to plant cornus in summer as it will require lots of watering and struggle to establish well.
Herbaceous species (namely C. canadensis) are best planted in autumn or spring. An autumn planting can be done by those gardening in mild conditions (and broadly speaking, this is the southern half of the UK). For those liable to cold winters, it is best to wait until spring (generally the northern half of the UK).
Flowering cornus species make an excellent specimen tree, perhaps in a lawn or at the edge of a woodland garden. Colourfully stemmed species are useful in many situations, adding bright, winter colour to borders, around ponds, and even container displays. They are also effective at reducing erosion when planted on banks and slopes. Plant closely together (50-60cm spacing) for a striking block of colour, combining a few different colours for variation. Groundcover species (C. canadensis) carpet the ground with dense leaves and produce showy flowers and striking fruits, making an attractive weed-suppressant for borders and woodland areas.
How to plant Cornus
- For planting in the garden, dig the soil area removing any large stones and weeds and breaking up any lumps. Mix in some organic matter – ideally with an acidic pH, such as ericaceous compost, composted pine needles, or leaf mould. Rake level and firm with your heels. Rake level again.
- Water the plant well and allow to drain before planting.
- Dig a hole twice the size of the root-ball.
- Place the plant in the hole, ensuring the top of the root ball sits level with the surface of the soil. Most species of flowering dogwood are grafted, so when planting these look for the graft union (a slight bulge at the base of the stem) and ensure it sits just above soil level. Planting it too deep can result in vigorous suckers as well as increasing the risk of dieback.
- Backfill with soil and firm in gently with your foot.
- Soak well with water.
- Mulch around the base with well-rotted organic matter. Mulch around the base with the same, slightly acidic organic matter – ericaceous compost, composted pine needles, or leaf mould.
- It can be useful to wrap a tree guard around the base of small trees to protect against damage from rabbits, deer, and squirrels.
- Trees taller than 60-90cm when planting will need staking. Knock a pointed, wooden stake into the ground facing into the direction of the prevailing wind. Tie in (ideally with a rubber tree tie), remembering to check and loosen ties every year.
- For planting in containers, first choose an appropriately sized pot. The best practice is to start just a few centimetres larger than the rootball and repot into a slightly larger size every year or two. Always ensure there are plenty of drainage holes in the bottom.
- If you are using a large or heavy pot, it can be a good idea to fill and plant it in situ to save yourself the trouble of moving once full.
- Use a good quality compost, ericaceous if you can, with a generous amount of horticultural grit mixed in, and, if not already present (check the description on the bag) some slow-release fertiliser granules – again ericaceous is best, but standard is also fine if this is all you have available.
- Start by partially filling the pot with compost; enough so that when placed on it the upper surface of the root ball is about 3cm lower than the top of the pot.
- Infill all the space surrounding the root ball with compost, firming down with your fingers then adding a little more so the plant is held tight.
- Pick up the container and lightly tap on the potting bench or ground a few times to help further settle the compost around the plant.
- Soak well with water.
- A mulch with horticultural grit will look attractive and help to prevent a ‘cap’ or crust forming on the top of the compost (something container plants can suffer due to the artificial nature of their watering).

What to plant with Cornus
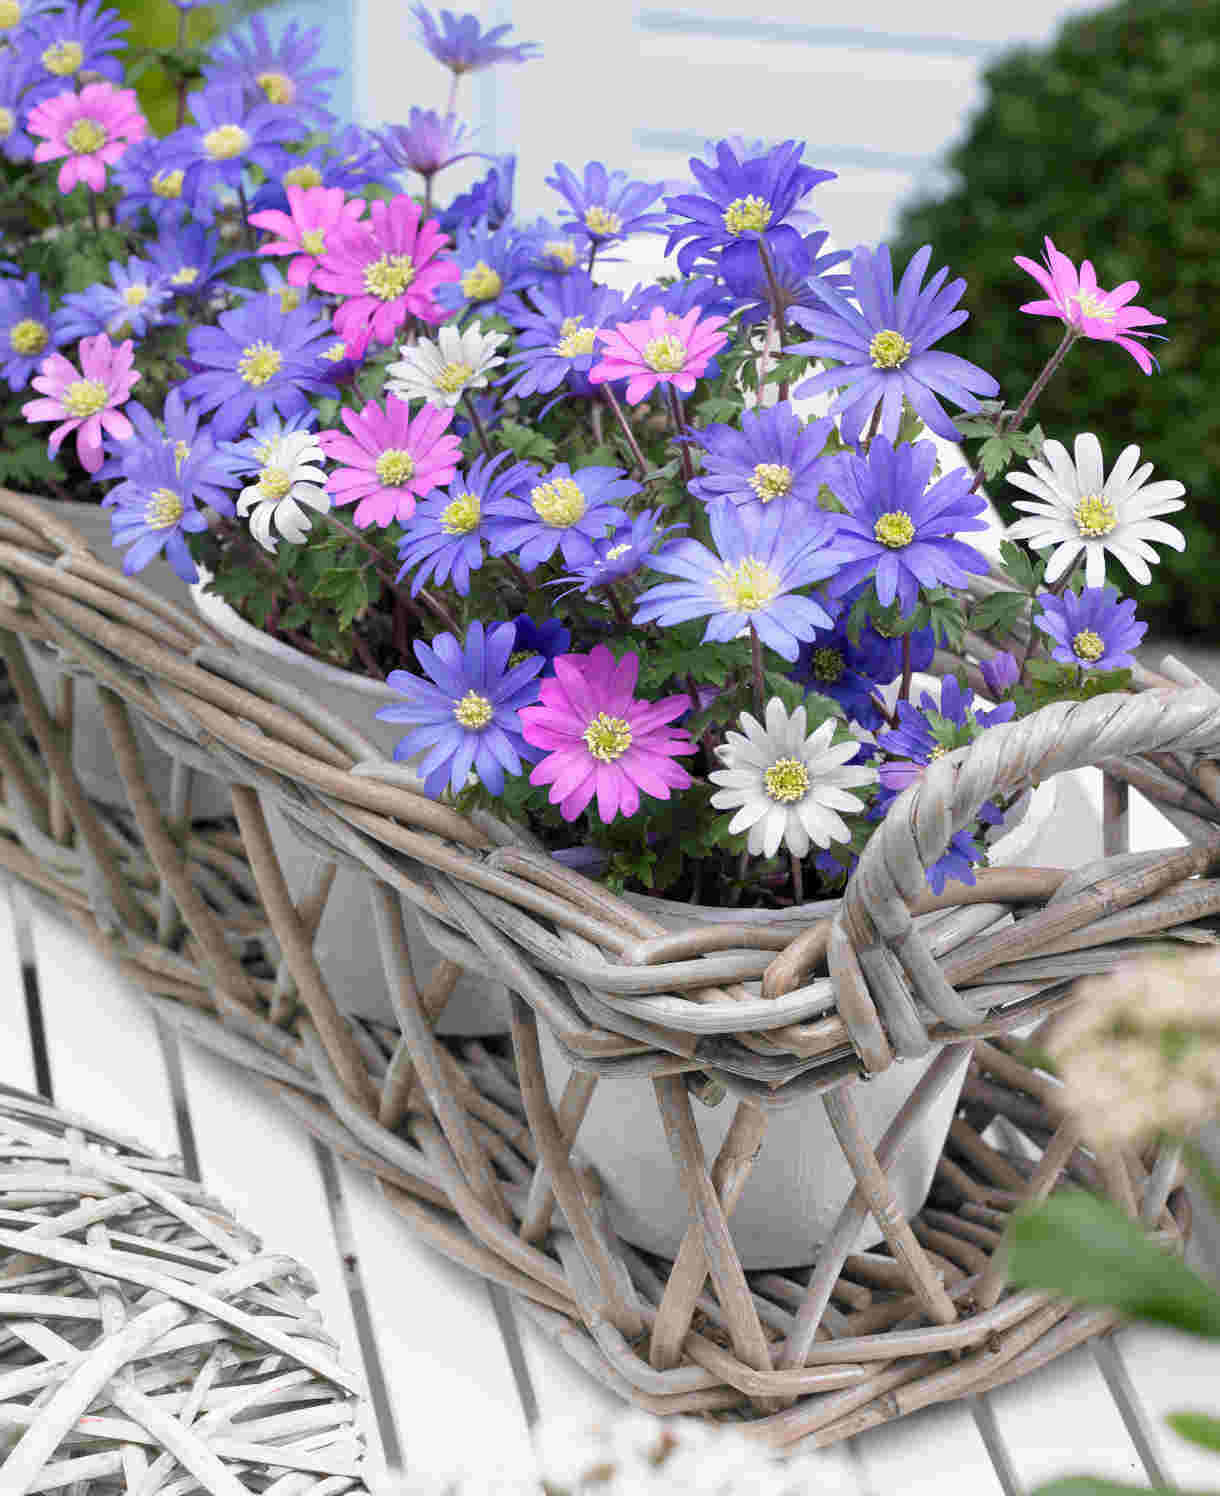
The conditions beneath flowering species are ideal for an underplanting of delicate spring flowers, such as Anemone blanda, narcissus, and galanthus.
Colourfully stemmed species looks good in front of an evergreen backdrop to really show off their vibrant tones. Camellia, rhododendron, and pittosporum are all good, shrubby candidates, as are evergreen climbers and wall shrubs such as Clematis armandii, evergreen species of ceanothus, climbing hydrangea, and garrya.
How to care for Cornus
Pruning and Deadheading
Flowering species are classed as RHS Pruning Group 1, which means pruning is not only unnecessary but actively discouraged as it is likely to spoil the overall appearance. The only potential intervention needed is the removal of the odd branch when young to encourage the most pleasing shape possible. Doing this at an early stage makes for smaller scars and offers best long-term results. Best carried out in early spring.
The other exception to the ‘no pruning’ rule is for those species which bear spreading, tiered branches, such as C. controversa. These may occasionally send up unwanted vertical growth which can be removed in spring.
Colourfully stemmed species are in Pruning Group 7, i.e., best cut back hard in spring to generate the fresh, brightly coloured growth they’re grown for. An April chop allows plenty of time to enjoy the winter stems but is early enough to allow for plenty of regrowth.
In terms of where to cut, you can either coppice (cut to about 5cm above ground), or pollard (cut to thigh height). It’s important to allow plants at least two years to establish before you start pruning in this way – they need a decent root system to respond with an energetic flush of growth. Over time you’ll see a stool developing, which is a hard knobbly stump from which shoots emerge. Watch out for your eyes when pruning this sort of cornus, the long whippy growth can give a nasty poke and it’s worth wearing goggles to protect yourself.
In years where there has been weak growth, trim back only very lightly and wait until the following year to go hard again.
Groundcover species are also in Pruning Group 1, needing next to no secateur action other than a very light tidy of dead or tatty leaves in spring.
Watering
Flowering species are slow to establish and therefore need help with watering for a good few years after planting. Aiming for consistently moist but not soggy soil, give a good soak whenever conditions are very dry. To avoid overdoing it, allow the top few centimetres of soil to dry out between watering – a finger wiggled down until it hits moisture is the quickest way to check this. After 3-4 years you should be able to step back, only watering in the most prolonged periods of drought.
Colourfully stemmed and groundcover species are a little more self-sufficient. Provided they are planted in reliably moist soil, they should need regular watering only for the first growing season or two, then in periods of drought as above.
Don’t panic and rush for the hose if you see your cornus wilting. Many species do this in response to hot temperatures and perk up again in the evening – it doesn’t necessarily mean the soil is dry.
Feeding
On healthy, fertile soil, an annual mulch of well-rotted organic matter should provide sufficient nutrients for your cornus. This has the added benefit of suppressing weeds and locking in moisture. Autumn and spring are the best times to carry out mulching.
For an extra boost (most needed in the first few years of the plant being in the ground, immediately after coppicing, or when growing in poor soil), applying an ericacous or general-purpose granular feed to the surface of the soil and lightly working in (known as a ‘top dress’) can reap benefits. Aim to do this in late winter or early spring.
Container-grown plants rely even more on the gardener for nutrition. Get off to a flying start by making sure you use a good quality compost, then throughout the growing season (March to September) apply a liquid feed every 3-4 weeks. Once the plant is in the largest container possible for the situation and repotting is no longer feasible, an annual topdress is advised. Each spring, scrape away the top 5cm of compost and replace with fresh, remembering to mix in a little ericaceous or general-purpose slow-release feed.
Cold Protection
Cornus is hardy enough to withstand a UK winter without the need for additional protection. Having said this, like all plants, those grown in a container can be more susceptible to the cold. If you are in a very cold or exposed spot, in can be worth wrapping these in fleece or hessian for the winter months. As well as insulating the roots, this will also help prevent the pot cracking in the frost.
Pests and Diseases
Some cornus species can be susceptible to a fungal disease known as cornus anthracnose. It is active during the growing season (spring until autumn), disfiguring and killing leaves and new shoots. Maintaining good garden hygiene (tidying away fallen leaves and dead plant material), and encouraging a healthy, balanced garden ecosystem are key to warding off problems. Try to avoid use of chemicals, grow a wide variety of plants, and do all you can to welcome wildlife into the space.
Cornus florida and Cornus nuttallii are the most affected species, with Cornus kousa, Cornus controversa, and Cornus sericea also susceptible.
How to propagate Cornus
Flowering species best propagated via softwood cuttings in late spring or early summer, though bear in mind that as most of this type of cornus are grafted to control size and vigour, the resulting plants may not behave in the same way as the parent plant:
- Snip cuttings off the plant, if possible taking a longer piece than the ideal eventual length of 5-10cm (to allow for trimming).
- Put them in a plastic bag straight away to prevent drying out.
- Fill several pots with a well-draining compost mix.
- Trim the end of the cutting to just below a node (point at which leaves grow).
- Remove lowest leaves, leaving 2-4 on the cutting.
- Insert the cuttings into the compost and water lightly. Several cuttings can be put in the same container if there is enough space to do this without them touching.
- Place in a greenhouse or propagating unit if you have one or covered with a plastic bag on a windowsill if not (out of direct sunlight).
- Keep the cuttings misted and occasionally watered until they root. You will know this has happened when roots emerge out of the bottom of the container.
- Gently remove rooted cuttings and pot them into individual pots. Grow on in a cool yet frost-free environment such as an unheated conservatory, greenhouse, or cold frame, until they are large enough to be planted out.
Colourfully stemmed species are better as hardwood cuttings, taken from late autumn to early winter:
- Select shoots of fully ripe, current year growth, cutting at ground level.
- Select a healthy and firm section of the stem and trim to 15-20cm, with the top cut just above a pair of buds, and the bottom cut just below a pair of buds. It is good practice to make the top cut a sloping one, both to aid water runoff, and to remind you which end is which! Upside down cuttings have zero chance of rooting.
- Spacing approximately 10-15cm apart, firm into a trench in a prepared bed outside (with well-rotted organic matter and grit dug in), the top 3-5cm of the cutting showing above soil level. Alternatively insert into containers filled with a gritty compost mix.
- Water in lightly. Place containers in a cold frame or unheated greenhouse.
- Check and re-firm trench cuttings after a frost (which can lift them out of the ground).
- Leave cuttings in place until the following autumn ensuring they do not dry out during the summer. By this point they should have rooted and can be lifted and either potted or planted out as required.
Groundcover species (C. canadensis) can be lifted and divided in autumn or spring:
- Choose a day when the soil is not frozen or waterlogged.
- Dig the plant out of the ground.
- Shake off any excess soil.
- Separate the plant into sections using either swift, cutting blows with a sharp spade, or two forks inserted back-to-back with tines touching, handles then pushed together to prise the plant apart.
- Discard old, damaged, or surplus pieces, keeping healthy, vigorous material.
- Replant decent-sized pieces where desired, and any smaller bits can be potted up.
- Water well until fully established.
* Many plants carry Plant Breeders Rights and cannot be propagated for commercial purposes.
Common Cornus questions
Does cornus grow in the shade?
Cornus will tolerate a little shade, though full sun brings best results in terms of leaf and stem colour, as well as flowering. Deep shade is best avoided.
How fast does cornus grow?
Flowering tree species are notoriously slow growing. kousa, for example, can take over 50 years to reach full size. C. florida takes 20-50 years, while C. controversa 10-20.
Colourfully stemmed shrubby species are much faster, particularly when responding to coppicing. Cut down to the ground in spring, they will have plenty of waist high(-ish) colourful stems by the end of that growing season.
Can you grow cornus in a pot?
Smaller, shrubby species are best, but success can also be had with flowering tree species, provided they are well-cared for. By this we mean repotting into a slightly larger container every few years (for as long as this is feasible), plus keeping on top of feeding and watering. Carry out an annual topdress (see ‘Feeding’ above), once repotting into a larger container is no longer an option.
How do you tell cornus apart from salix (willow)?
While some species of the two do look remarkably similar, there is a simple trick to distinguishing them. Cornus buds are opposite, the way to remember this being that there is an ‘o’ in the name. Salix buds are alternate, indicated by the ‘a’ in the name.
Why is my white-flowered cornus turning pink?
On flowering species, all flowers emerge green, turn their ‘main’ colour (i.e., the one on the label or description), then fade away to pink.
What happens if you neglect the coppicing of colourfully stemmed species?
Over time, some of the stems growing along the ground may root, and plants can produce suckers. The whole lot gets bigger and bigger, until you are left with a tangled mess and not much in the way of stem colour (the wood loses this with age).
If you inherit a garden with this issue, the best practice is to start afresh, either with cuttings or new plants.
My colourfully stemmed dogwood isn’t responding to coppicing with the same gusto it used to. What’s the problem?
These plants do run out of steam after a while and send up fewer shoots. Make your own replacements by taking hardwood cuttings as described above.