


How to grow Astilboides
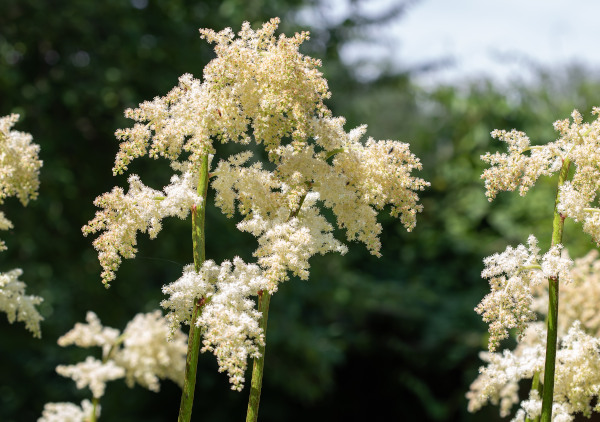
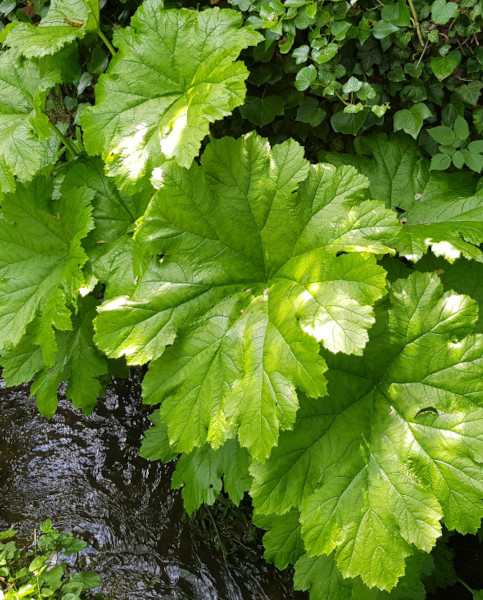
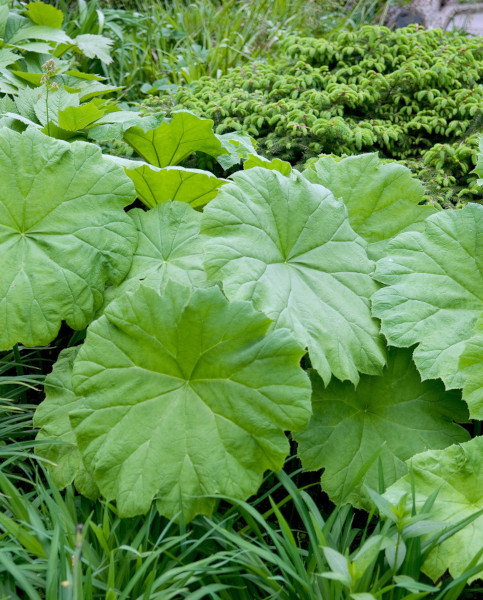
Classed as a rodgersia until it was assigned its own genus, there is just one species (tabularis) of this clump-forming perennial. Native to moist woodland on the banks of lakes and streams in N.E China and N. Korea, it is prized by gardeners as a bold, architectural plant for moist shade, mainly due to its huge, striking leaves which form a neat mound. The leaves can range from dinnerplate size up to 1m across and are rounded with slightly scalloped edges. In summer they are joined by tall flower spikes (up to 1.2m high) bearing lots of small, creamy white flowers. The botanical name describes the plant perfectly – its flowers resemble those of astilbe (hence astilboides), and tabularis means table-like (as in the broad, flat foliage).
Astilboides tabularis is sometimes referred to using its former name, Rodgersia tabularis.
Key Information
Soil pH

Position
Hardiness

Where to plant Astilboides
For best results, plant in autumn or spring. An autumn planting can be done by those gardening in mild conditions (and broadly speaking, this is the southern half of the UK). For those liable to cold winters, it is best to wait until spring (generally the northern half of the UK). Planting can also be carried out in summer, though be prepared to water regularly.
Astilboides makes a bold specimen plant for any cool, moist, partially shaded spot. A woodland garden or beside a pond is ideal, though if you do plant next to water make sure you locate the roots above water level as it suffers in waterlogged conditions.
If you’re struggling to find somewhere that remains cool and moist during the height of summer, an extra mulch at the start of the season can help to lock in moisture and keep the soil temperature down.
Astilboides can also be grown in a large container, providing it is watered and fed regularly, and kept in a cool, partially shaded spot.
How to plant Astilboides
- For planting in the garden, dig the soil area removing any large stones and weeds and breaking up any lumps. Mix in some organic matter such as garden compost. Rake level and firm with your heels. Rake level again.
- Water plants well and allow to drain before planting.
- A good tip is to dig a hole twice the size of the root-ball. Fill with water and allow to drain before placing in the plant.
- Place the plant in the hole, ensuring the top of the root ball sits level with the surface of the soil. Too low and the plant may rot, too high and the roots can dry out.
- Backfill with soil and firm in gently with your foot.
- Soak well with water.
- Mulch around the base with well-rotted organic matter.
- For planting in containers, first choose an appropriately sized pot. The best practice is to start just a few centimetres larger than the rootball and increase in size every year or two. Always ensure there are plenty of drainage holes in the bottom.
- If you are using a large or heavy pot, it can be a good idea to fill and plant it in situ to save yourself the trouble of moving once full.
- Use a good quality potting compost with plenty of horticultural grit mixed in, and, if not already present in the compost (check the description on the bag) some slow-release fertiliser granules.
- Start by partially filling the pot with compost; enough so that when placed on it the upper surface of the root ball is about 3cm lower than the top of the pot.
- Infill all the space surrounding the root ball with compost, firming down with your fingers then adding a little more so the plant is held tight.
- Pick up the pot (if you can!) and lightly tap on the potting bench or ground a few times to help further settle the compost around the plant.
- Soak well with water.
- A mulch with horticultural grit will look attractive and help to prevent a ‘cap’ or crust forming on the top of the compost (something container plants can suffer due to the artificial nature of their watering).
How to care for Astilboides
Pruning and Deadheading
Simply cut back the flower spikes after flowering, and the leaves as they start to die down in autumn. Using sharp secateurs, cut both back to just above soil level.
Watering
New plantings require more regular watering than established plants. During the first growing season in the ground, a good soaking every couple of weeks should ensure long-term success (aiming for consistently moist, but not soggy soil). After this, astilboides will need watering only in very dry spells. An annual mulch in autumn or spring helps lock moisture into the soil (see also ‘Feeding’ section below). Do this again in summer (following a good soaking with water) if your soil is prone to drying out in hot weather.
Container-grown astilboides need to be watered regularly throughout the growing season. Allow the top few centimetres of compost to dry out between soakings. Check soil surface with fingertips to see if it feels dry to the touch.
Feeding
On healthy, fertile soil, an annual mulch of well-rotted organic matter (i.e., a good layer of manure or garden compost applied to the soil around the plant) should provide sufficient nutrients for your astilboides. This has the added benefit of suppressing weeds and locking in moisture.
For an extra boost (perhaps your astilboides is looking stressed, you garden on poor soil, or it has been knocked back by slugs and snails), applying a general-purpose granular feed to the surface of the soil and lightly working in (known as a ‘top dress’) can reap benefits. Aim to do this once or twice a year if needed.
Container-grown plants rely even more on the gardener for their nutritional needs. Get off to a flying start by making sure you use a good quality compost, then throughout the growing season (March to September) apply a liquid feed at regular intervals according to its instructions. Alternatively, top dress with a general-purpose granular feed every three months throughout the growing season.
Cold Protection
Given the right conditions, astilboides is hardy and able to withstand even a very cold UK winter without the need for additional protection. It is worth noting, however, that overly wet or dry soil may compromise hardiness.
Pests and Diseases
Astilboides tends to be trouble-free, although you may occasionally find that slugs and snails develop a taste for the large buds.
Encouraging natural predators into your garden, such as birds, frogs, toads, and hedgehogs, will make a big difference. Torchlight searches after dark (when slugs and snails are at their most active) are also effective, allowing you to collect the offending molluscs in a bucket. Place on the compost heap, or in a part of the garden containing less vulnerable plants.
How to propagate Astilboides
The quickest and most efficient way to propagate astilboides is by dividing in spring as growth begins.
- Choose a day when the soil is not frozen or waterlogged.
- Dig the plant out of the ground.
- Shake off any excess soil.
- Separate the plant into sections using either swift, cutting blows with a sharp spade, or two forks inserted back-to-back with tines touching, handles then pushed together to prise the plant apart.
- Discard old, damaged, or surplus pieces, keeping healthy, vigorous material.
- Replant decent-sized pieces where desired, and any smaller bits can be potted up.
- Water well until fully established.
* Many plants carry Plant Breeders Rights and cannot be propagated for commercial purposes.
Common Astilboides questions
- Does astilboides come back?
Yes, this hardy perennial dies back for winter and then reemerges in spring. Given the right conditions it should remain in your garden for many years. - My astilboides flowers are drooping, is there something wrong?
Not at all, the clusters of flowers are heavy and will often droop over slightly. It is their natural habit and not an indication of thirst.