


How to grow Argemone
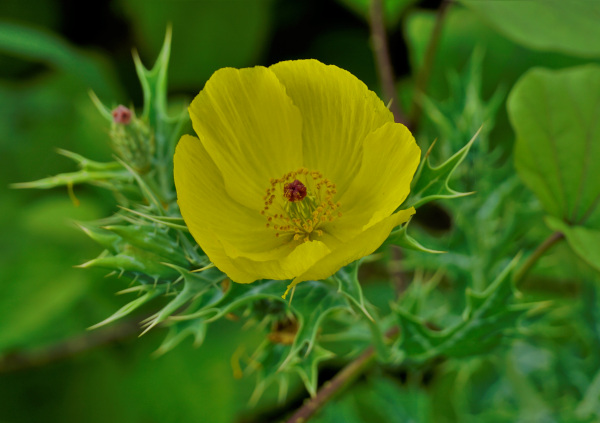
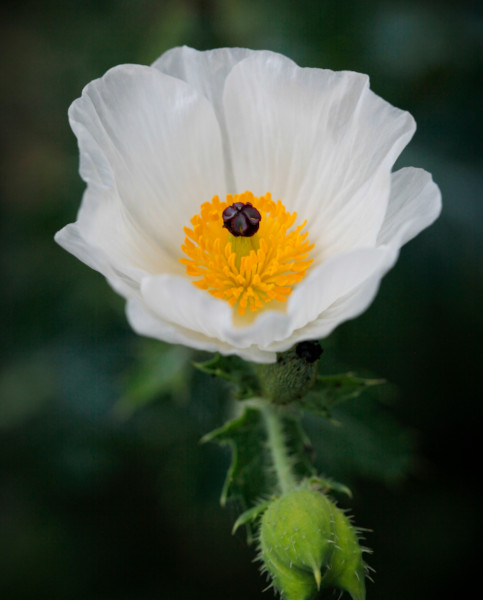
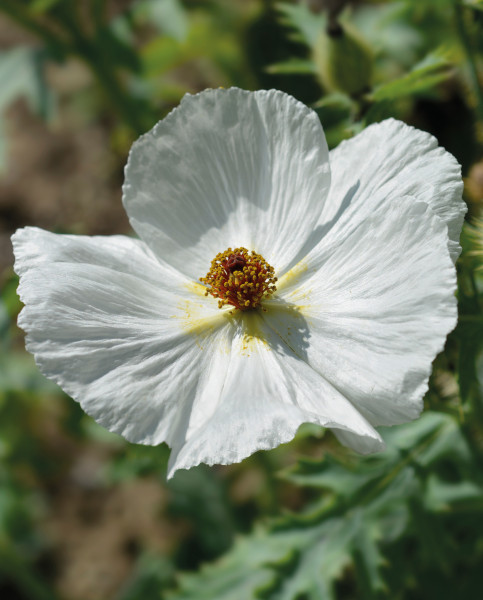
Also known as prickly poppy, argemone is a half-hardy plant from southern USA, Central America, and the West Indies. From fleshy roots it produces clusters of prickly foliage (similar to thistle leaves), joined from summer to autumn by a long succession of large, papery, poppy-like blooms. These can be white, yellow, or mauve depending on the species, and go on to develop spiny, ornamental seedheads. Argemone is notable for the pale yellow to orange latex produced by its stems when cut.
Here in the UK, all species of argemone tend to be treated as annuals due to their inability to withstand our winter temperatures. Argemone is a highly drought tolerant plant which is useful for tricky, hot dry spots in the garden where little else will grow. It’s worth noting that all parts of the plant are highly toxic, so is perhaps not one for gardens frequented by young children.
Argemone is not to be confused with the similar sounding agrimony – a hardy wildflower with yellow flower spikes native to UK meadows.
Key Information
Soil pH

Position
Hardiness

Where to plant Argemone
Argemone grows naturally in a warm, frost-free climate, and can only be planted out in the UK once all risk of frost has passed. This varies from region to region, though tends to be around mid to late May. If your plants arrive before it is safe to move them outside, keep in a protected environment such as a conservatory, greenhouse, or a sunny window or porch, until the time is right. If you have ordered small 4cm plug plants, pot these into individual 9cm pots as soon as they arrive and store as above.
Argemone is ideal for gravel gardens, free-draining borders, or coastal gardens. If allowed (i.e., seedheads left intact late into the year), it will self-seed freely and maintain a presence in the area.
Argemone resents root disturbance as its fleshy roots are very easily damaged, so take care to get the planting spot right first time. Alternatively, grow in a container filled with free-draining compost.
How to plant Argemone
For best results, harden your argemone plants off (i.e., acclimatise them to the conditions outside) over the course of a week or so before moving out full time. A coldframe is perfect, allowing you to gradually increase the time the lid remains open until eventually leaving it open all night. Alternatively, you can take the following steps:
- First few days: move your plant outside, just during the day at first
- Next few days: leave out all the time, with a fleece covering at night
- Final few days: leave out completely uncovered
Then:
- For planting in the garden, dig the soil area removing any large stones and weeds and breaking up any lumps. Rake level and firm with your heels. Rake level again.
- Water plants well and allow to drain before planting.
- Dig a hole twice the size of the root-ball.
- Place the plant in the hole, ensuring the top of the root ball sits level with the surface of the soil. Too low and the plant may rot, too high and the roots can dry out.
- Backfill with soil and firm in gently with your foot.
- Soak well with water.
- Mulch around the base with horticultural grit.
- For planting in containers, first choose an appropriately sized pot, just a few centimetres larger than the rootball. Ensure there are plenty of drainage holes in the bottom.
- Use a good quality potting compost with a generous amount of horticultural grit mixed in (aim for around 30-40% grit), and, if not already present in the compost (check the description on the bag) some slow-release fertiliser granules.
- Start by partially filling the pot with compost; enough so that when placed on it the upper surface of the root ball is about 3cm lower than the top of the pot.
- Infill all the space surrounding the root ball with compost, firming down with your fingers then adding a little more so the plant is held tight.
- Pick up the container and lightly tap on the potting bench or ground a few times to help further settle the compost around the plant.
- Soak well with water.
- A mulch with horticultural grit will look attractive and help to prevent a ‘cap’ or crust forming on the top of the compost (something container plants can suffer due to the artificial nature of their watering).
How to care for Argemone
Pruning and Deadheading
Deadheading will prolong flowering and prevent excessive self-seeding if needed.
At the end of the growing season, simply remove the whole plant to the compost heap.
Watering
Water your argemone a handful of times during the first couple of months in the ground, after which it is extremely drought-tolerant and largely self-sufficient. When watering, allowing the top few centimetres of soil to dry out between each time will help you avoid overdoing it. Wiggle your finger down into the soil to check this.
If you are growing argemone in a container, aim for infrequent big soakings (rather than little and often), allowing the compost to almost fully dry out in between.
Feeding
Argemone is adapted to growing in nutrient-poor soils and so requires no additional feeding when grown in the ground.
In a container, good quality potting compost with some slow release fertiliser granules mixed in should be enough to support a year’s worth of growth.
Cold Protection
Argemone originates from the warmer climes than ours and will not survive a frost. Keep in a protected, frost-free environment until it is safe to plant out, then remove to the compost heap at the end of the growing season.
Such is its propensity to self-seed and vigorous speed of growth, rather than attempting to overwinter perennial species it is better to simply allow a plant to set seed. This will result in fresh, young plants in the same area the following year (providing you don’t accidentally weed out the seedlings).
Pests and Diseases
Argemone is considered problem-free. Its prickly, poisonous nature keeps hungry pests at bay, and it is not known to suffer from disease.
How to propagate Argemone
The most effective way to propagate argemone is by seed. Either leave seedheads intact on the plant and let nature take its course, or collect and sow by hand:
- Seeds are typically ready for collecting in late summer when the seedheads have dried and turned brown.
- Snip the seedheads from the plant using scissors or secateurs. Try to do this in dry conditions, and shake or separate into a small paper bag or envelope.
- Store somewhere cool and dry until early spring (late March/ early April).
- Fill a seed tray, small pot, or module tray with a well-draining compost mix, picking up and tapping two or three times on the potting bench or table to compress.
- Sprinkle the seeds evenly over the surface of the compost, pressing down lightly to ensure contact. If using a module tray, aim for two to four seeds per module.
- Cover with a thin layer of compost (ideally using a garden sieve), or vermiculite.
- Water gently with a fine spray until the compost is evenly moist but not waterlogged.
- Place the seed tray or pots in a heated propagation unit if you have one (set at 18°C), or cover pots with clingfilm if not. Position in indirect light.
- As soon as the seeds begin to germinate, take out of the propagation unit or remove the clingfilm.
- When the seedlings have grown large enough to handle, transplant them into individual pots filled with a well-draining mix and continue to grow on in a frost-free environment.
- Keep barely moist, never soggy.
- Plant out once all risk of frost has passed, following our ‘How to plant argemone’ section above.
* Many plants carry Plant Breeders Rights and cannot be propagated for commercial purposes.