


How to grow Amorpha
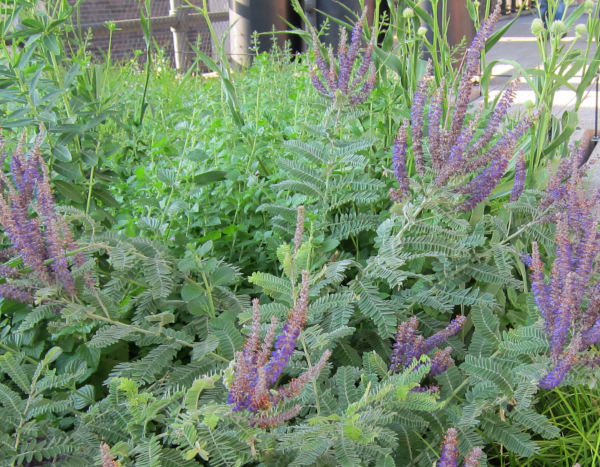
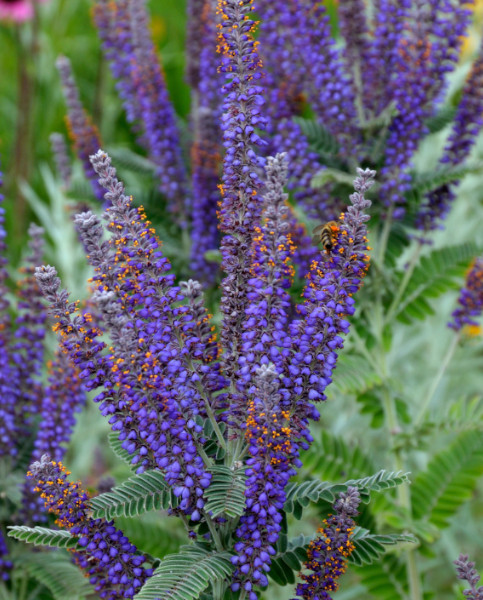
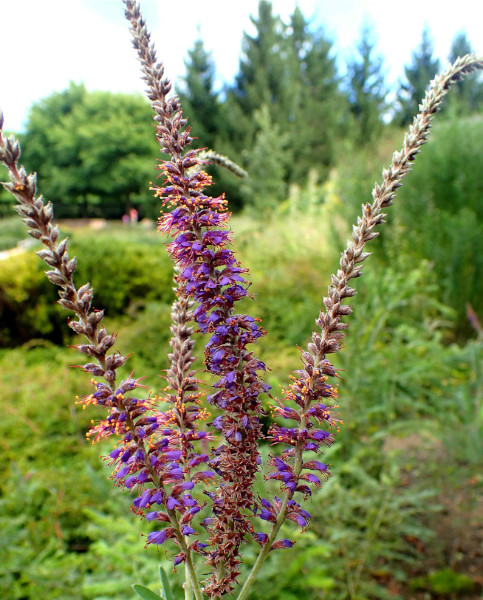
Amorpha is a genus of deciduous shrubs found growing in dry, sandy areas throughout North America. A member of the pea family, it gets its name from the Latin for ‘without form’, due to its unusual, single-petalled flowers. These are held in upright racemes (almost veronicastrum-like in appearance) which erupt from aromatic, pinnate foliage.
Of the 15 species, two are commonly cultivated: Amorpha canescens (lead plant), and A. fruticosa (bastard indigo). Both have violet-purple flowers with pronounced orange-yellow anthers, though differ in size (A. fruticosa can grow to around four times the size of A. canescens), and flowering period. A. fruticosa flowers during summer with brown, upright seedheads in autumn, while A. canescens flowers several weeks later; from late summer into autumn.
Amorpha is highly attractive to pollinators and traditionally used by Native Americans for healing and medicinal purposes. It is an exceptionally hardy shrub, capable of withstanding temperatures of -30°C and below.
Key Information
Soil pH

Position
Hardiness

Where to plant Amorpha
Amorpha are best planted in spring or autumn. An autumn planting can be done by those gardening in mild conditions (and broadly speaking, this is the southern half of the UK). For those liable to cold winters, it is best to wait until spring (generally the northern half of the UK). Planting can also be carried out in summer, though be prepared to water regularly.
Amorpha is exceptionally drought tolerant and robust, so is ideal for those trickier very dry or cold spots. It fits well into a mixed or shrub border, and can be naturalised in a wildflower, meadow, or prairie scheme. It is less well-suited to life in a container due to having very deep roots which can grow a whopping 4-5 metres down into the ground (hence the drought tolerance!). You may have temporary success for a year or so in a deep container, though will need to plant it in the open ground after this.
How to plant Amorpha
- For planting in the garden, dig the soil area removing any large stones and weeds and breaking up any lumps.
- If you have it, now is the time to dig in plenty of well-rotted organic matter, such as garden compost or manure.
- Rake level and firm with your heels. Rake level again.
- Water the plant well and allow to drain before planting.
- Dig a hole twice the size of the root-ball.
- Place the plant in the hole, ensuring the top of the root ball sits level with the surface of the soil. Too low and the plant may rot, too high and the roots can dry out.
- Backfill with soil and firm in gently with your foot.
- Soak well with water.
- Mulch around the base with well-rotted organic matter.
- For planting in containers, go for the deepest pot you can find, with a diameter just a few centimetres bigger than the current width of the rootball. Always ensure there are plenty of drainage holes in the bottom.
- If you are using a large or heavy pot, it can be a good idea to fill and plant it in situ to save yourself the trouble of moving once full.
- Use a good quality potting compost with a generous amount of horticultural grit mixed in (aim for around 30% grit), and, if not already present in the compost (check the description on the bag) some slow-release fertiliser granules.
- Start by partially filling the pot with compost; enough so that when placed on it the upper surface of the root ball is about 3cm lower than the top of the pot.
- Infill all the space surrounding the root ball with compost, firming down with your fingers then adding a little more so the plant is held tight.
- Pick up the container and lightly tap on the potting bench or ground a few times to help further settle the compost around the plant.
- Soak well with water.
- A mulch with horticultural grit will look attractive and help to prevent a ‘cap’ or crust forming on the top of the compost (something container plants can suffer due to the artificial nature of their watering).
How to care for Amorpha
Pruning and Deadheading
Amorpha does not require deadheading, though you can remove the brown seedheads if you wish.
Amorpha does best with an annual hard prune (cutting the whole lot down to about 40cm above ground level), either at the end of the growing season or in early spring. This generates a rush of soft, new, bushy growth which will produce plenty of flowers later in the season. Not pruning, or pruning very lightly, results in a sparser plant with a poorer show of flowers.
Watering
Water your amorpha a handful of times during the first couple of months in the ground, after which it is extremely drought-tolerant and largely self-sufficient. When watering, allowing the top few centimetres of soil to dry out between each time will help you avoid overdoing it. Wiggle your finger down into the soil to check this.
If you do decide to have a go at growing amorpha in a container, aim for infrequent big soakings (rather than little and often).
Feeding
Amorpha is adapted to growing in sandy, nutrient-poor soils, and so is not a hungry plant. An annual mulch of well-rotted organic matter (i.e., a layer of manure or garden compost applied to the soil around the plant) should provide more than enough sustenance, while having the added benefit of suppressing weeds and locking in moisture.
In a container, good quality compost with some slow release fertiliser granules mixed in should sustain growth for a year without the need for any additional feeding. Give it a boost at the start of the second year in the container, by providing a ‘top dress’. This means scraping away the top 5cm or so of compost and replacing with fresh – again, with slow release fertiliser granules mixed in. After these two years in a container, we recommend relocating your amorpha into the open ground where its naturally deep and searching roots will be able to run free.
Cold Protection
Amorpha is exceptionally hardy and able to survive even the harshest of winters without the need for additional protection. Having said this, if you leave pruning it until spring you may notice some stem dieback over winter. This is perfectly normal and inconsequential if you chop the whole lot back each year (as per our pruning advice above).
Pests and Diseases
Amorpha can be susceptible to fungal diseases such as rust and powdery mildew. These are most likely to occur when high levels of nitrogen have encouraged an excessive amount of growth, so take care to plant in poor soil and avoid feeding artificially.
Removing and disposing of affected leaves as soon as you spot them can help, as can thinning out surrounding planting to improve air flow and light levels.
How to propagate Amorpha
Like most members of the pea family, amorpha can be propagated quickly and easily using seeds. Sowing is best done in autumn.
- Seeds are typically ready for collecting late in the growing season when they’ve turned hard and black.
- Snip the seedheads from the plant using scissors or secateurs. Try to do this in dry conditions, and shake the seeds into a small, labelled paper bag or envelope. Either sow straight away, or store somewhere cool and dry until you are ready to do so.
- Germination can be sped up by softening the hard outer coating of the seeds with an overnight soak in water.
- As with all members of the pea family, it is best to keep root disturbance to a minimum by sowing into module trays. Fill with a well-draining compost mix then tap lightly on a hard surface to remove any large air pockets.
- Push one or two seeds down slightly into each module.
- Use a garden sieve to cover with a fine layer of compost.
- Water the soil gently with a fine spray until it is evenly moist but not waterlogged.
- Place the seed tray or pots anywhere light, cool, and protected, such as a windowsill, coldframe, or unheated greenhouse.
- If there more than one seedling germinates per module, remove the weakest.
- When the seedlings have grown large enough to handle, pot up into 9cm and grow on until they are big enough to be planted out into the garden, as per out ‘How to plant amorpha’ section above.
* Many plants carry Plant Breeders Rights and cannot be propagated for commercial purposes.
Common Amorpha questions
- How long does amorpha flower for?
Expect to have flowers for around three to four weeks, followed by brown seedheads. - Is amorpha the same as indigo?
Although related (both members of the pea family), amorpha and indigo (Indigofera) are two distinct plants. Amorpha is sometimes known as bastard indigo or false indigo due to there being a slight resemblance.