


You have no items in your shopping basket.
How to grow Ammi
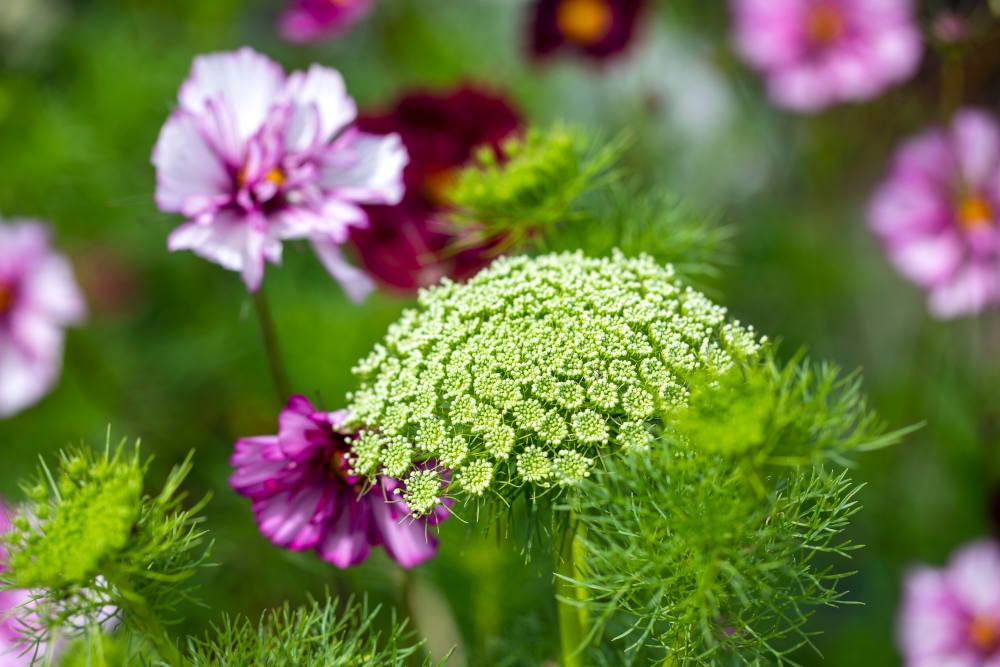
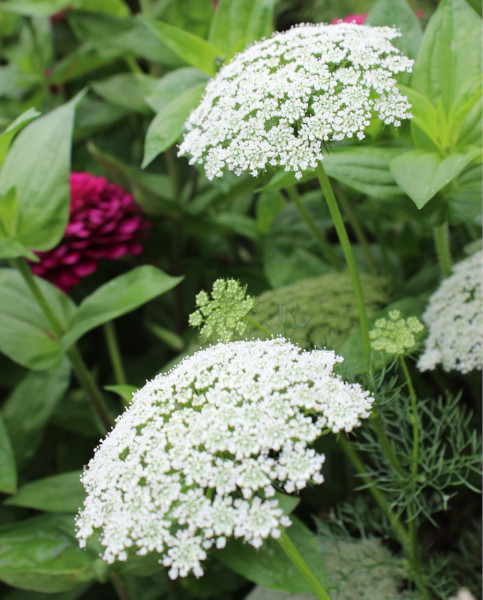
There are about 10 species of this member of the carrot family, though only two are widely cultivated by gardeners – Ammi majus and Ammi visnaga. These easy annuals are grown for their delicate, feathery foliage and white, umbel flowerheads. They are popular summer-flowering ‘fillers’, ideal for padding out gaps between perennials or for use as fast growing, emergency replacements for unexpected winter losses in the border.
Though very similar, there are subtle differences between the two species. Ammi majus has white, wispy flowerheads which create a light and airy texture, whereas Ammi visnaga has larger, chunkier, rounded flowerheads with a green tinge, particularly when immature.
Ammi is also known by the common names of bishop’s flower and bishop’s weed.
Key Information
Soil pH

Position
Hardiness

Where to plant Ammi
We send our ammi out as 4cm young plants in spring. These can either be planted out straight into the garden (go for it if the weather is mild and you have well-draining soil) or potted up and grown on for a few weeks (advisable in harsh or very wet conditions).
Weave your ammi throughout beds and borders, using them to plug gaps or holes in the existing planting. A long tap root means they’re happier in the ground than in a container, though if you really want to have a go opt for the deepest pot you can find.
How to plant Ammi
- For planting in the garden, dig the soil area removing any large stones and weeds and breaking up any lumps.
- Rake level and firm with your heels. Rake level again.
- Water plants well and allow to drain before planting.
- A good tip is to dig a hole twice the size of the root-ball. Fill with water and allow to drain before placing in the plant.
- Place the plant in the hole, ensuring the top of the root ball sits level with the surface of the soil. Too low and the plant may rot, too high and the roots can dry out.
- Backfill with soil and firm in gently with your foot.
- Soak well with water.
- Mulch around the base with well-rotted organic matter.
- For planting in containers, go for as deep a pot as you can to accommodate the long tap root. Ensure there are plenty of drainage holes in the bottom.
- If you are using a large or heavy pot, it can be a good idea to fill and plant it in situ to save yourself the trouble of moving once full.
- Use a good quality potting compost with some horticultural grit mixed in and, if not already present (check the labelling on the bag) some slow-release fertiliser granules.
- Start by partially filling the pot with compost; enough so that when placed on it the upper surface of the root ball is about 3cm lower than the top of the pot.
- Fill around the plant with compost, firming down with your fingers then adding a little more so it is held tight.
- Pick up the container (if you can!) and lightly tap on the potting bench or ground a few times to help further settle the compost around the plant.
- Soak well with water.
- A mulch with horticultural grit will look attractive and help to prevent a ‘cap’ or crust forming on the top of the compost (something container plants can suffer due to the artificial nature of their watering).

How to care for Ammi
Pruning and Deadheading
No pruning required. Either remove to the compost heap when finished, or leave in place until spring to allow goldfinches to feed on the seedheads during winter.
Watering
Ammi in the ground should be given a good watering in on planting, followed by a thick layer of mulch to lock the moisture in (see next section for more on this). Water again a few more times in the coming weeks, after which its deep tap root should sustain it in all but the hottest, driest weather.
With its limited root run, ammi in a container requires regular watering throughout the growing season. To avoid overwatering, a good rule of thumb is to allow the top couple of centimetres to dry out between soakings. To check this, wiggle your finger down into the compost until you feel moisture. Be aware that in the height of summer containers can need watering every day, particularly those in full sun.
Feeding
On healthy, fertile soil, a mulch of well-rotted organic matter (i.e., a layer of leaf mould, manure, or garden compost applied to the soil around the plant) should provide more than enough nutrients for your ammi. This has the added benefit of suppressing weeds and locking in moisture. Make this the final stage of planting, after watering.
Container-grown plants are different as they rely solely on the gardener for nutrition. Get off to a flying start by making sure you use a good quality compost with slow-release granules mixed in. These generally provide nutrients for around 6 to 8 weeks, after which you’ll need to apply a balanced liquid feed every 2-3 weeks until the end of the growing season (i.e., September-ish).
Cold Protection
While ammi is hardy, it can still be damaged by harsh weather when young. If you garden in a frost pocket or northern part of the UK, either delay planting out until late spring/ early summer or protect new plantings with a cloche or fleece whenever a hard frost is forecast.
Pests and Diseases
Ammi is considered trouble free.
How to propagate Ammi
Ammi is best propagated by seed, sown directly into the soil to minimise root disturbance (something all members of the carrot family resent due to their tap roots).
This can be done in either autumn or spring. An autumn sowing is suitable for milder parts of the country and will result in bigger, tougher, earlier-flowering plants, though it’s worth noting that the seedlings may need protecting with a cloche or fleece in unusually harsh winter weather. A spring sowing is best if you live further north or are prone to very cold, wet winters. Look out for weed seeds beginning to germinate in the garden – a good indicator that the soil is warm enough to get sowing.
- Seeds are typically ready for collecting in late summer when they’ve turned hard and dark.
- Snip the seedheads from the plant using scissors or secateurs. Try to do this in dry conditions, and shake or separate the seeds into a small, labelled paper bag or envelope. Store somewhere cool and dry until you are ready to sow in either autumn or spring.
- Clear the area of weeds, and rake over the surface until you have a fine tilth.
- Scatter seeds thinly.
- Lightly rake over to incorporate with the soil.
- Water with a watering can fitted with a fine rose.
- When seedlings are large enough to handle, thin out to a spacing of approximately 30cm.
* Many plants carry Plant Breeders Rights and cannot be propagated for commercial purposes.
Common Ammi questions
- Can I sow ammi seeds in a pot?
You can, but be aware that too much root disturbance is likely to check growth. Try to reduce this by sowing in a module tray, just a pinch of seeds in each module. Thin to one seedling when they germinate, then either pot each module into a 9cm pot to grow on, or plant straight out into the garden. - Is Ammi visnaga the same as Visnaga daucoides?
Yes, the two are synonyms for one another.