


How to grow Aloysia
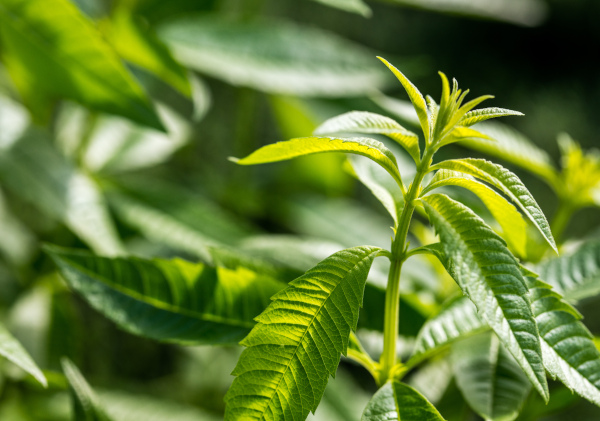
There are over thirty species of this member of the verbena family, though only one – the Chile and Argentina native Aloysia citriodora – is widely cultivated in the UK. Also known as lemon verbena, this bushy, deciduous shrub is grown for its extremely aromatic leaves, said to offer the most powerful lemon scent of any plant. The leaves can be used both fresh or dried, making an excellent substitute for lemon zest in the kitchen, a delicious flavouring for drinks, or pleasantly scented pot pourri.
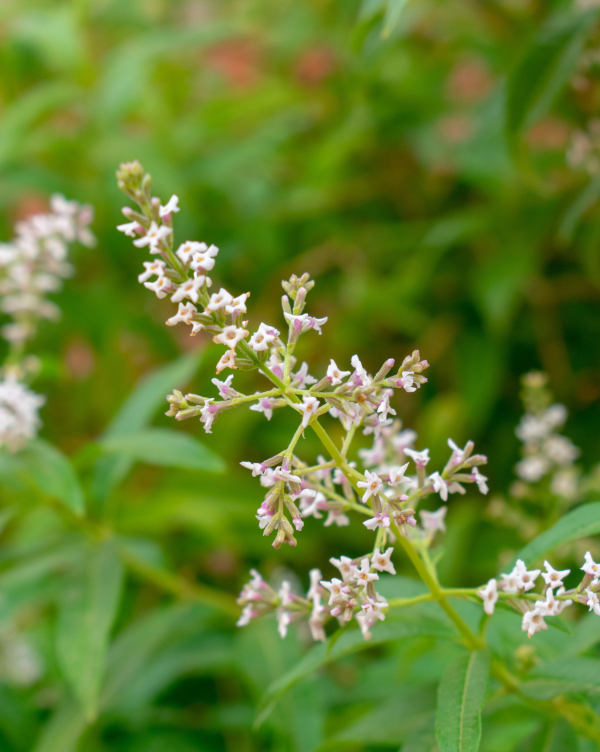
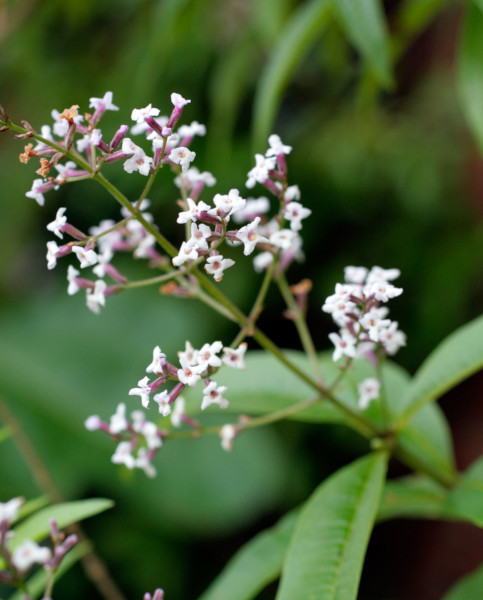
In late summer, the shrub erupts in spikes of delicate, tiny, pale lilac flowers.
Aloysia citriodora is not to be confused with lemon balm (Melissa officinalis), the much hardier and sometimes invasive perennial belonging to the mint family.
Key Information
Soil pH

Position
Hardiness

Where to plant Aloysia
grows naturally in a warm, frost-free climate, and can only be planted out in the UK once all risk of frost has passed. This varies from region to region, though tends to be around mid to late May. If your plant arrives before it is safe to move it outside, keep it in a protected environment such as a conservatory, greenhouse, or a sunny window or porch, until the time is right.
Aloysia is well suited to a container as this makes it easy to move indoors for winter, however it can also be grown in the open ground. You may get away with leaving it in all year if you plant it at the base of a warm, sheltered wall and follow the advice in the ‘Cold Protection’ section below. Otherwise, it will need to be dug up and potted each autumn to allow for overwintering under cover. Of course, if you are lucky enough to offer a mild microclimate – perhaps you live in a sheltered coastal or city centre location – you can grow outdoors all year round without concern, and it may even be trained as a wall shrub. In any case, give it your sunniest, most sheltered spot.
How to plant Aloysia
For best results, harden your aloysia off (i.e., acclimatise it to the conditions outside) over the course of a week or so before moving it out full time. A coldframe is perfect, allowing you to gradually increase the time the lid remains open until eventually leaving it open all night. Alternatively, you can take the following steps:
- First few days: move your plant outside, just during the day at first
- Next few days: leave out all the time, with a fleece covering at night
- Final few days: leave out completely uncovered
Then:
- For planting in containers, first choose an appropriately sized pot. The best practice is to start just a few centimetres larger than the rootball and increase in size every year or two. Always ensure there are plenty of drainage holes in the bottom.
- If you are using a large or heavy pot, it can be a good idea to fill and plant it in situ to save yourself the trouble of moving once full.
- Use a good quality potting compost with a generous amount of horticultural grit mixed in (aim for around 30% grit), and, if not already present in the compost (check the description on the bag) some slow-release fertiliser granules.
- Start by partially filling the pot with compost; enough so that when placed on it the upper surface of the root ball is about 3cm lower than the top of the pot.
- Infill all the space surrounding the root ball with compost, firming down with your fingers then adding a little more so the plant is held tight.
- Pick up the container and lightly tap on the potting bench or ground a few times to help further settle the compost around the plant.
- Soak well with water.
- A mulch with horticultural grit will look attractive and help to prevent a ‘cap’ or crust forming on the top of the compost (something container plants can suffer due to the artificial nature of their watering).
- For planting in the garden, dig the soil area removing any large stones and weeds and breaking up any lumps. Rake level and firm with your heels. Rake level again.
- Water plants well and allow to drain before planting.
- A good tip is to dig a hole twice the size of the root-ball. Fill with water and allow to drain before placing in the plant.
- Place the plant in the hole, ensuring the top of the root ball sits level with the surface of the soil. Too low and the plant may rot, too high and the roots can dry out.
- Backfill with soil and firm in gently with your foot.
- Soak well with water.
Mulch around the base with horticultural grit.
How to care for Aloysia
Pruning and Deadheading
Left untouched this deciduous shrub can become straggly and misshapen, and therefore annual pruning is advised. Follow guidance for RHS pruning group 6, or 13 if wall trained.
Pruning group 6 means cutting back in early spring by a half or even more, as well as removing any thin, weak, dead, or damaged growth.
Pruning group 13 (for wall-trained shrubs) means reducing sideshoots to within four buds of a permanent woody framework in late winter. Remove any misplaced shoots, i.e., those growing towards the wall.
Watering
Originating from dry, rocky soils, aloysia is not a particularly thirsty plant, though does still need some watering. When planting it in the open ground, give a good initial soaking, then a few more over the following weeks while its roots establish. Allowing the top few centimetres of soil to dry out between each time is a good way to avoid overwatering. Wiggle your finger down until you feel moisture to check this. Once established, your aloysia should be self-sufficient in all but the hottest and driest of weather.
Aloysia grown in a container requires a little more attention as its root run is limited. Water regularly throughout the growing season – again allowing the top few centimetres of compost to dry out, checking this with the finger wiggle technique as above. Keep almost dry in winter, giving it just enough moisture to prevent it drying out completely.
Feeding
Aloysia is adapted to poor, low-nutrient conditions and is unlikely to need feeding in most garden soils.
In a container, resources are much more limited, and a monthly dose of a balanced liquid feed throughout the growing season is advisable. Remember also to repot your aloysia every few years into a slightly bigger pot, using fresh compost with slow-release granules mixed in. Once it reaches full size it can stay in the same pot with an annual topdress each spring. This means scraping away the top few centimetres of compost and replacing with fresh, again containing some slow-release granules.
Cold Protection
If you’ve found a warm, sheltered spot at the base of a sunny wall for your aloysia, you may get away with leaving it here all year round with a few extra measures to get it through winter. Firstly, apply a thick, dry mulch around in the roots in autumn to help protect them against the cold and wet (bark chips, straw, bracken, or grit all work well). Secondly, pop over one of these easy fleece jackets whenever a cold snap is expected.
Otherwise, you’ll need to move your aloysia indoors for winter. If grown in the ground, simply dig it up and pot temporarily. A conservatory, greenhouse, or sunny porch are all ideal.
Pests and Diseases
Aloysia is considered trouble free.
How to propagate Aloysia
The seeds of aloysia rarely germinate, therefore the recommended method of propagation is softwood cuttings, best taken in early summer.
- Choose non-flowering, soft, new stems, aiming to take a longer piece than the ideal eventual length of around 10cm (to allow for trimming).
- Put in a plastic bag straight away to prevent drying out.
- Fill a pot (or several, if you have a lot of cuttings) with a perlite-heavy compost mix (at least 50% perlite).
- Trim the end of the cutting to just below a node (point at which leaves grow).
- Remove lowest leaves and soft tip, leaving 2-4 leaves.
- If the remaining leaves are large, cut them in half with a sharp knife (to reduce water lost through transpiration).
- Insert the cuttings into the compost and water lightly. Several cuttings can be put in the same container if there is enough space to do this without them touching.
- Place in a greenhouse or propagating unit if you have one or covered with a plastic bag on a windowsill if not (out of direct sunlight).
- Keep the cuttings misted and occasionally watered until they root. You will know this has happened when roots emerge out of the bottom of the container.
- Gently remove rooted cuttings and pot them into individual pots. Grow on in a protected environment such as a greenhouse, windowsill, or coldframe until they are large enough to be used.
* Many plants carry Plant Breeders Rights and cannot be propagated for commercial purposes.